Epson 2070 Service Manual - Page 121
TPE Level Reset, Machine Select Menu, Factory Setting Menu
 |
UPC - 010343812277
View all Epson 2070 manuals
Add to My Manuals
Save this manual to your list of manuals |
Page 121 highlights
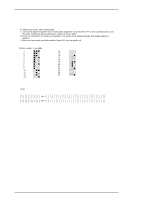
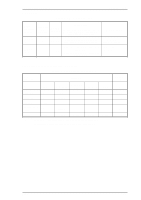
Adjustment LQ-2070 Service Manual 4.2.4 TPE Level Reset This section describes the procedure to reset the TPE (top paper end) level. This operation is required when the PW sensor assembly is replaced, and if it is not performed, the printer does not recognize that the PW sensor has been replaced, which limits the ability of the new sensor to operate. This reset operation can be performed only from the Settings Diskette. Note: • After this operation, the reset value for the TPE LEVEL is printed out automatically. Check that the reset value is FF. • When you run Check Pro. from the Main Menu after running the TPE LEVEL RESET, the TPE LEVEL is not printed for "FF." This is because the measured TPE level has been overwritten in the EERPOM. This is no problem unless an extremely low TPE LEVEL is printed as the Check Pro. result, despite the PW sensor's having been replaced and the TPE LEVEL being reset. If this occurs, replace the PW sensor again. 1. Insert the Settings Diskette into Drive A of the PC, and turn the power on. 2. Type GWBASIC and press ENTER. 3. Load and run the J10A30E program. First, the Machine Select Menu is displayed. Program : J10A30E Setting : VR 0 = 0 VR 1 = 0 VR 2 = 0 [ Printer select ] (1) 9 pins > (2) 24 pins Figure 4-14 Machine Select Menu 4. In this menu, highlight 24 pins by moving the cursor with ↑ or ↓ key, and select it by pressing ENTER. 5. After you select 24 pins, the Setting File menu is displayed. Program : J10A30E Setting : DEFSTD 24 pins VR 0 = 0 VR 1 = 0 VR 2 = 0 [ Factory Setting File ] > (1) DEFSTD (6) ITALIC (2) USASTD (3) EURSTD (4) NLSP (5) RUSSIAN Figure 4-15 Factory Setting Menu 6. In this menu, highlight the destination factory settings by moving the cursor with ↑ or ↓ key, and select the factory settings by pressing ENTER. 7. After you select the factory settings, the Main Menu is displayed. Program : J10A30E Setting : DEFSTD 24 pins VR 0 = 0 VR 1 = 0 VR 2 = 0 [ Main MENU ] (1) Bi-d Adjust (6) Check Pro. (Envelope) (2) Check Pro. (FF) > (7) TPE LEVEL RESET (3) Check Pro. (A3) (4) Check Pro. (A4 1P) (5) Check Pro. (A4 Multipart) Figure 4-16 Main Menu 8. In this menu, highlight TPE LEVEL RESET by moving the cursor with ↑ or ↓ key and select it by pressing ENTER. This operation prints the reset value of the TPE LEVEL automatically. The reset value should be FF in hexadecimal. Check that the reset value is FFH. 9. To exit the program, press ESC until the display returns to the MS-DOS prompt. 4-8 Rev.A
-
 1
1 -
2
-
3
-
4
-
5
-
6
-
7
-
8
-
9
-
10
-
11
-
12
-
13
-
14
-
15
-
16
-
17
-
18
-
19
-
20
-
21
-
22
-
23
-
24
-
25
-
26
-
27
-
28
-
29
-
30
-
31
-
32
-
33
-
34
-
35
-
36
-
37
-
38
-
39
-
40
-
41
-
42
-
43
-
44
-
45
-
46
-
47
-
48
-
49
-
50
-
51
-
52
-
53
-
54
-
55
-
56
-
57
-
58
-
59
-
60
-
61
-
62
-
63
-
64
-
65
-
66
-
67
-
68
-
69
-
70
-
71
-
72
-
73
-
74
-
75
-
76
-
77
-
78
-
79
-
80
-
81
-
82
-
83
-
84
-
85
-
86
-
87
-
88
-
89
-
90
-
91
-
92
-
93
-
94
-
95
-
96
-
97
-
98
-
99
-
100
-
101
-
102
-
103
-
104
-
105
-
106
-
107
-
108
-
109
-
110
-
111
-
112
-
113
-
114
-
115
-
 116
116 -
 117
117 -
 118
118 -
 119
119 -
 120
120 -
 121
121 -
 122
122 -
 123
123 -
 124
124 -
 125
125 -
 126
126 -
127
-
128
-
129
-
130
-
131
-
132
-
133
-
134
-
135
-
136
-
137
-
138
-
139
-
140
-
141
-
142
-
143
-
144
-
145
-
146
-
147
-
148
-
149
-
150
-
151
-
152
-
153
-
154
-
155
-
156
-
157
-
158
-
159
-
160
-
161
-
162
-
163
-
164
-
165
 |
 |
