Epson LQ 670 User Manual - Page 109
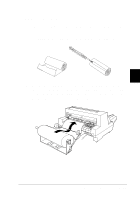
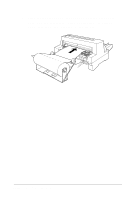
printer's internal socket. Then reinsert the screws and tighten, To remove the interface card
 |
View all Epson LQ 670 manuals
Add to My Manuals
Save this manual to your list of manuals |
Page 109 highlights
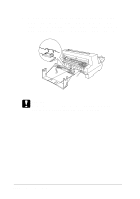
2. Rem ove the screw s secu ring the shield p late to the back of the printer and remove the plate. 3. Slid e the interface card along the slots on both sid es of the interface com p artm ent. Firm ly p u sh in the card to m ake su re the connector at the back of the card is fu lly inserted into the p rinter 's internal socket. Then reinsert the screw s and tighten them. N o t e: Store the shield plate in a safe place; you will need to reattach it if you remove the interface card. To rem ove the interface card , reverse the step s above. 5-20 Using Printer Options
-
 1
1 -
2
-
3
-
4
-
5
-
6
-
7
-
8
-
9
-
10
-
11
-
12
-
13
-
14
-
15
-
16
-
17
-
18
-
19
-
20
-
21
-
22
-
23
-
24
-
25
-
26
-
27
-
28
-
29
-
30
-
31
-
32
-
33
-
34
-
35
-
36
-
37
-
38
-
39
-
40
-
41
-
42
-
43
-
44
-
45
-
46
-
47
-
48
-
49
-
50
-
51
-
52
-
53
-
54
-
55
-
56
-
57
-
58
-
59
-
60
-
61
-
62
-
63
-
64
-
65
-
66
-
67
-
68
-
69
-
70
-
71
-
72
-
73
-
74
-
75
-
76
-
77
-
78
-
79
-
80
-
81
-
82
-
83
-
84
-
85
-
86
-
87
-
88
-
89
-
90
-
91
-
92
-
93
-
94
-
95
-
96
-
97
-
98
-
99
-
100
-
101
-
102
-
103
-
 104
104 -
 105
105 -
 106
106 -
 107
107 -
 108
108 -
 109
109 -
 110
110 -
 111
111 -
 112
112 -
 113
113 -
 114
114 -
115
-
116
-
117
-
118
-
119
-
120
-
121
-
122
-
123
-
124
-
125
-
126
-
127
-
128
-
129
-
130
-
131
-
132
-
133
-
134
-
135
-
136
-
137
-
138
-
139
-
140
-
141
-
142
-
143
-
144
-
145
-
146
-
147
-
148
-
149
-
150
-
151
-
152
-
153
-
154
-
155
-
156
-
157
-
158
-
159
-
160
-
161
-
162
-
163
-
164
-
165
-
166
-
167
-
168
-
169
-
170
-
171
-
172
-
173
-
174
-
175
-
176
-
177
-
178
-
179
-
180
-
181
-
182
-
183
-
184
-
185
-
186
-
187
-
188
 |
 |

2.
Remove the screws securing the shield plate to the back of the
printer and remove the plate.
3.
Slide the interface card along the slots on both sides of the
interface compartment. Firmly push in the card to make sure
the connector at the back of the card is fully inserted into the
printer’s internal socket. Then reinsert the screws and tighten
them.
Note:
Store the shield plate in a safe place; you will need to reattach it if you
remove the interface card.
To remove the interface card, reverse the steps above.
5-20
Using Printer Options