Epson LQ 670 User Manual - Page 53
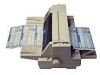
the arrow mark on the printer. Then push down the lock lever
 |
View all Epson LQ 670 manuals
Add to My Manuals
Save this manual to your list of manuals |
Page 53 highlights
3. Release the sp rocket lock levers by p u shing them u p . 4. Facing the back of the p rinter, p osition the left sp rocket u nit so that the sp rocket p ins are to the left of the "0" on the scale and the arrow m ark on the p rinter. Then p u sh d ow n the lock lever to lock the sp rocket in p lace. a rrow ma rk sc a le Not e: Printing starts at the arrow mark on the printer and the "0" mark on the scale. The unprintable area is to the left of the arrow mark and the "0". 3-12 Paper Handling
-
 1
1 -
2
-
3
-
4
-
5
-
6
-
7
-
8
-
9
-
10
-
11
-
12
-
13
-
14
-
15
-
16
-
17
-
18
-
19
-
20
-
21
-
22
-
23
-
24
-
25
-
26
-
27
-
28
-
29
-
30
-
31
-
32
-
33
-
34
-
35
-
36
-
37
-
38
-
39
-
40
-
41
-
42
-
43
-
44
-
45
-
46
-
47
-
 48
48 -
 49
49 -
 50
50 -
 51
51 -
 52
52 -
 53
53 -
 54
54 -
 55
55 -
 56
56 -
 57
57 -
 58
58 -
59
-
60
-
61
-
62
-
63
-
64
-
65
-
66
-
67
-
68
-
69
-
70
-
71
-
72
-
73
-
74
-
75
-
76
-
77
-
78
-
79
-
80
-
81
-
82
-
83
-
84
-
85
-
86
-
87
-
88
-
89
-
90
-
91
-
92
-
93
-
94
-
95
-
96
-
97
-
98
-
99
-
100
-
101
-
102
-
103
-
104
-
105
-
106
-
107
-
108
-
109
-
110
-
111
-
112
-
113
-
114
-
115
-
116
-
117
-
118
-
119
-
120
-
121
-
122
-
123
-
124
-
125
-
126
-
127
-
128
-
129
-
130
-
131
-
132
-
133
-
134
-
135
-
136
-
137
-
138
-
139
-
140
-
141
-
142
-
143
-
144
-
145
-
146
-
147
-
148
-
149
-
150
-
151
-
152
-
153
-
154
-
155
-
156
-
157
-
158
-
159
-
160
-
161
-
162
-
163
-
164
-
165
-
166
-
167
-
168
-
169
-
170
-
171
-
172
-
173
-
174
-
175
-
176
-
177
-
178
-
179
-
180
-
181
-
182
-
183
-
184
-
185
-
186
-
187
-
188
 |
 |

3.
Release the sprocket lock levers by pushing them up.
4.
Facing the back of the printer, position the left sprocket unit so
that the sprocket pins are to the left of the “0” on the scale and
the arrow mark on the printer. Then push down the lock lever
to lock the sprocket in place.
Note:
Printing starts at the arrow mark on the printer and the “0” mark
on the scale. The unprintable area is to the left of the arrow mark
and the “0”.
sc a le
arrow mark
3-12
Paper Handling