Epson LQ 670 User Manual - Page 24
the ribbon and to make sure the ribbon moves freely., Close the printer cover.
 |
View all Epson LQ 670 manuals
Add to My Manuals
Save this manual to your list of manuals |
Page 24 highlights
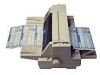
4. H old the ribbon cartrid ge w ith the exp osed ribbon d ow n and the ribbon-tightening knob facing you , and gu id e the ribbon u nd er the p rint head . Then snap the cartrid ge into p lace so that the tabs on both sid es of the cartrid ge fit into the notches in the cartrid ge hold er. 5. Tu rn the ribbon-tightening knob again to rem ove any slack in the ribbon and to m ake sure the ribbon moves freely. 6. Close the p rinter cover. 1-8 Setting Up the Printer
-
 1
1 -
2
-
3
-
4
-
5
-
6
-
7
-
8
-
9
-
10
-
11
-
12
-
13
-
14
-
15
-
16
-
17
-
18
-
 19
19 -
 20
20 -
 21
21 -
 22
22 -
 23
23 -
 24
24 -
 25
25 -
 26
26 -
 27
27 -
 28
28 -
 29
29 -
30
-
31
-
32
-
33
-
34
-
35
-
36
-
37
-
38
-
39
-
40
-
41
-
42
-
43
-
44
-
45
-
46
-
47
-
48
-
49
-
50
-
51
-
52
-
53
-
54
-
55
-
56
-
57
-
58
-
59
-
60
-
61
-
62
-
63
-
64
-
65
-
66
-
67
-
68
-
69
-
70
-
71
-
72
-
73
-
74
-
75
-
76
-
77
-
78
-
79
-
80
-
81
-
82
-
83
-
84
-
85
-
86
-
87
-
88
-
89
-
90
-
91
-
92
-
93
-
94
-
95
-
96
-
97
-
98
-
99
-
100
-
101
-
102
-
103
-
104
-
105
-
106
-
107
-
108
-
109
-
110
-
111
-
112
-
113
-
114
-
115
-
116
-
117
-
118
-
119
-
120
-
121
-
122
-
123
-
124
-
125
-
126
-
127
-
128
-
129
-
130
-
131
-
132
-
133
-
134
-
135
-
136
-
137
-
138
-
139
-
140
-
141
-
142
-
143
-
144
-
145
-
146
-
147
-
148
-
149
-
150
-
151
-
152
-
153
-
154
-
155
-
156
-
157
-
158
-
159
-
160
-
161
-
162
-
163
-
164
-
165
-
166
-
167
-
168
-
169
-
170
-
171
-
172
-
173
-
174
-
175
-
176
-
177
-
178
-
179
-
180
-
181
-
182
-
183
-
184
-
185
-
186
-
187
-
188
 |
 |

4.
Hold the ribbon cartridge with the exposed ribbon down and
the ribbon-tightening knob facing you, and guide the ribbon
under the print head. Then snap the cartridge into place so
that the tabs on both sides of the cartridge fit into the notches
in the cartridge holder.
5.
Turn the ribbon-tightening knob again to remove any slack in
the ribbon and to make sure the ribbon moves freely.
6.
Close the printer cover.
1-8
Setting Up the Printer