Epson LQ 670 User Manual - Page 83
length for tractor
 |
View all Epson LQ 670 manuals
Add to My Manuals
Save this manual to your list of manuals |
Page 83 highlights
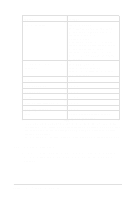
Option Se tting s Cha ra c ter ta b le Sta nd a rd mo d e l: Ita lic , PC437, PC850, PC860, PC863, PC865, PC861, BRASCII, Ab ic o mp , ISO La tin 1, Ro ma n 8 All o ther mo d e ls: Ita lic , PC437, PC437 Gree k, PC850, PC852, PC853, PC855, PC857, PC864, PC866, PC869, ISO La tin 1T, ISO 8859-7, MAZOWIA, Co d e MJK, Bulg a ria , Esto nia , PC774, ISO 8859-2, PC866 LAT. Inte rna tiona l c ha ra c ter se t fo r Ita lic ta b le Ita lic U.S.A., Ita lic Fra nc e, Ita lic Ge rm a ny, Ita lic U.K., Ita lic De nm a rk, Ita lic Sw ed en, Ita lic Ita ly, Ita lic Sp a in 0 sla sh On, Off Hig h sp ee d d ra ft On, Off Inp ut b uffe r On, Off Bu zze r On, Off Auto CR (IBM 2390 Plus) ** On, Off AGM (IBM 2390 Plus) ** On, Off Font * OCR-B, Ora to r, Ora to r-S, Sc rip t C, Rom a n T, Sa ns Se rif H * Fonts se lec ted in the d e fa ult-setting m od e c o rresp o nd to Othe rs on the c o ntro l p a ne l. The follo wing a d d itio na l fonts a re a va ila b le o nly b y p ressing the Fo nt b utton on the c o ntro l p a ne l: Dra ft, Rom a n, Sa ns Se rif, Co urier, Pre stig e , a nd Sc rip t. ** These setting s a re e ffec tive only w he n IBM 2390 Plus e mula tion is sele c te d . Pa ge length for tractor For p ap er fed throu gh the tractor, you can set the p age length to one of the follow ing: 3, 3.5, 4, 5.5, 6, 7, 8, 8.5, 11, 70/ 6, 12, 14, or 17 inches. 4-10 Using the Control Panel
-
 1
1 -
2
-
3
-
4
-
5
-
6
-
7
-
8
-
9
-
10
-
11
-
12
-
13
-
14
-
15
-
16
-
17
-
18
-
19
-
20
-
21
-
22
-
23
-
24
-
25
-
26
-
27
-
28
-
29
-
30
-
31
-
32
-
33
-
34
-
35
-
36
-
37
-
38
-
39
-
40
-
41
-
42
-
43
-
44
-
45
-
46
-
47
-
48
-
49
-
50
-
51
-
52
-
53
-
54
-
55
-
56
-
57
-
58
-
59
-
60
-
61
-
62
-
63
-
64
-
65
-
66
-
67
-
68
-
69
-
70
-
71
-
72
-
73
-
74
-
75
-
76
-
77
-
 78
78 -
 79
79 -
 80
80 -
 81
81 -
 82
82 -
 83
83 -
 84
84 -
 85
85 -
 86
86 -
 87
87 -
 88
88 -
89
-
90
-
91
-
92
-
93
-
94
-
95
-
96
-
97
-
98
-
99
-
100
-
101
-
102
-
103
-
104
-
105
-
106
-
107
-
108
-
109
-
110
-
111
-
112
-
113
-
114
-
115
-
116
-
117
-
118
-
119
-
120
-
121
-
122
-
123
-
124
-
125
-
126
-
127
-
128
-
129
-
130
-
131
-
132
-
133
-
134
-
135
-
136
-
137
-
138
-
139
-
140
-
141
-
142
-
143
-
144
-
145
-
146
-
147
-
148
-
149
-
150
-
151
-
152
-
153
-
154
-
155
-
156
-
157
-
158
-
159
-
160
-
161
-
162
-
163
-
164
-
165
-
166
-
167
-
168
-
169
-
170
-
171
-
172
-
173
-
174
-
175
-
176
-
177
-
178
-
179
-
180
-
181
-
182
-
183
-
184
-
185
-
186
-
187
-
188
 |
 |
