Epson LX-80 User Manual - Page 119
In each tractor slot are two pegs that fit into the notches on
 |
View all Epson LX-80 manuals
Add to My Manuals
Save this manual to your list of manuals |
Page 119 highlights
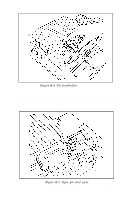
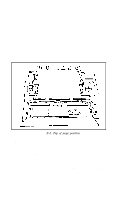
In each tractor slot are two pegs that fit into the notches on the tractor fittings. Tilt the tractor back so that the rear notches fit over the rear pegs. Then tilt the unit forward until it clicks into place. That's all there is to it. Now install the paper separator and pull out the paper guide as shown in Figure E-4. Fit the notches in the bottom corners of the separator over the pins at the front of the paper slot. The separator keeps the paper that is coming out of the printer from being pulled back in. Pull out the paper guide at the back of the printer. This guide helps keep the incoming paper from catching on the printer cable. Figure E-4. Paper separator and paper guide E-3
-
 1
1 -
2
-
3
-
4
-
5
-
6
-
7
-
8
-
9
-
10
-
11
-
12
-
13
-
14
-
15
-
16
-
17
-
18
-
19
-
20
-
21
-
22
-
23
-
24
-
25
-
26
-
27
-
28
-
29
-
30
-
31
-
32
-
33
-
34
-
35
-
36
-
37
-
38
-
39
-
40
-
41
-
42
-
43
-
44
-
45
-
46
-
47
-
48
-
49
-
50
-
51
-
52
-
53
-
54
-
55
-
56
-
57
-
58
-
59
-
60
-
61
-
62
-
63
-
64
-
65
-
66
-
67
-
68
-
69
-
70
-
71
-
72
-
73
-
74
-
75
-
76
-
77
-
78
-
79
-
80
-
81
-
82
-
83
-
84
-
85
-
86
-
87
-
88
-
89
-
90
-
91
-
92
-
93
-
94
-
95
-
96
-
97
-
98
-
99
-
100
-
101
-
102
-
103
-
104
-
105
-
106
-
107
-
108
-
109
-
110
-
111
-
112
-
113
-
 114
114 -
 115
115 -
 116
116 -
 117
117 -
 118
118 -
 119
119 -
 120
120 -
 121
121 -
 122
122 -
 123
123 -
 124
124 -
125
-
126
-
127
-
128
-
129
-
130
-
131
-
132
-
133
-
134
-
135
-
136
-
137
-
138
-
139
-
140
-
141
-
142
-
143
-
144
-
145
-
146
-
147
-
148
-
149
-
150
-
151
-
152
-
153
-
154
-
155
-
156
-
157
-
158
 |
 |

In each tractor slot are two pegs that fit into the notches on the
tractor fittings. Tilt the tractor back so that the rear notches fit over
the rear pegs. Then tilt the unit forward until it clicks into place.
That’s all there is to it.
Now install the paper separator and pull out the paper guide as
shown in Figure E-4. Fit the notches in the bottom corners of the
separator over the pins at the front of the paper slot. The separator
keeps the paper that is coming out of the printer from being pulled
back in. Pull out the paper guide at the back of the printer. This guide
helps keep the incoming paper from catching on the printer cable.
Figure E-4. Paper
separator
and
paper guide
E-3