Epson LX-80 User Manual - Page 18
Control Panel, Now that your paper is loaded, it is time to plug in the printer
 |
View all Epson LX-80 manuals
Add to My Manuals
Save this manual to your list of manuals |
Page 18 highlights
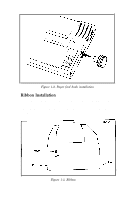
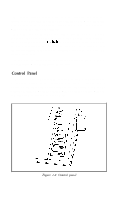
See that the printer is turned off, open the front lid, and push the friction lever back and the paper bail forward. Then move the print head by hand to the center of the printer and feed the paper into the paper slot in the top of the printer, When the paper will not go any farther, turn the paper feed knob to advance it as you would with a typewriter. Turn the knob until the top of the paper is at least 3/+inch above the ribbon guide. Then push the paper bail against the paper. If the paper becomes crooked, pull the friction-release lever forward, straighten the paper, and push the friction lever back. If you have the optional tractor unit for continuous pin-feed paper, see Appendix E for instructions on its use. Control Panel Now that your paper is loaded, it is time to plug in the printer and see what the buttons on the control panel do. First, see that the power switch on the right side of the printer is off; then plug in the power cord. Now turn on the power switch and look at the control panel on the right side of the top of your LX-80. Figure 1-8. Control panel 10
-
 1
1 -
2
-
3
-
4
-
5
-
6
-
7
-
8
-
9
-
10
-
11
-
12
-
 13
13 -
 14
14 -
 15
15 -
 16
16 -
 17
17 -
 18
18 -
 19
19 -
 20
20 -
 21
21 -
 22
22 -
 23
23 -
24
-
25
-
26
-
27
-
28
-
29
-
30
-
31
-
32
-
33
-
34
-
35
-
36
-
37
-
38
-
39
-
40
-
41
-
42
-
43
-
44
-
45
-
46
-
47
-
48
-
49
-
50
-
51
-
52
-
53
-
54
-
55
-
56
-
57
-
58
-
59
-
60
-
61
-
62
-
63
-
64
-
65
-
66
-
67
-
68
-
69
-
70
-
71
-
72
-
73
-
74
-
75
-
76
-
77
-
78
-
79
-
80
-
81
-
82
-
83
-
84
-
85
-
86
-
87
-
88
-
89
-
90
-
91
-
92
-
93
-
94
-
95
-
96
-
97
-
98
-
99
-
100
-
101
-
102
-
103
-
104
-
105
-
106
-
107
-
108
-
109
-
110
-
111
-
112
-
113
-
114
-
115
-
116
-
117
-
118
-
119
-
120
-
121
-
122
-
123
-
124
-
125
-
126
-
127
-
128
-
129
-
130
-
131
-
132
-
133
-
134
-
135
-
136
-
137
-
138
-
139
-
140
-
141
-
142
-
143
-
144
-
145
-
146
-
147
-
148
-
149
-
150
-
151
-
152
-
153
-
154
-
155
-
156
-
157
-
158
 |
 |
