Epson LX-80 User Manual - Page 66
Designing Process, not one of them. You can, however, create and print such a symbol
 |
View all Epson LX-80 manuals
Add to My Manuals
Save this manual to your list of manuals |
Page 66 highlights
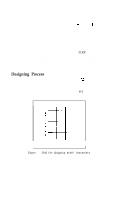
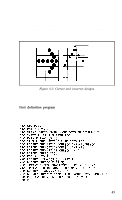
After you have created your own characters with our programs, certain keys that you seldom use will generate the user-defined characters. For example, you will be able to type = to print t . Your user-defined characters can be utilitarian or imaginative, anything from a scientific symbol to script letters for your initials. Just follow the simple steps below. The only restriction on your creativity is that the characters you define must follow the same rules that govern the rest of the characters printed by the LX-80. They must fit into an 11x9 matrix, no dot can overlap another, and either the top or the bottom row must be empty. Look at the enlargements of sample letters in Chapter 3 to see how the standard LX-80 characters are designed. Designing Process Suppose that you need the Greek letter sigma (2) for your work. Although the LX-80 has a number of special symbols, the sigma is not one of them. You can, however, create and print such a symbol with ease. First, use a grid like the one in Figure 8-l to plan where to place the dots. 123456789 Figure 8-l. Grid for designing draft characters Because the last two columns are reserved for the space between characters, we have not included them in the grid. And since most characters do not use the bottom two rows, we have used a heavy line to indicate the usual lower limit for an LX-80 character. 62
-
 1
1 -
2
-
3
-
4
-
5
-
6
-
7
-
8
-
9
-
10
-
11
-
12
-
13
-
14
-
15
-
16
-
17
-
18
-
19
-
20
-
21
-
22
-
23
-
24
-
25
-
26
-
27
-
28
-
29
-
30
-
31
-
32
-
33
-
34
-
35
-
36
-
37
-
38
-
39
-
40
-
41
-
42
-
43
-
44
-
45
-
46
-
47
-
48
-
49
-
50
-
51
-
52
-
53
-
54
-
55
-
56
-
57
-
58
-
59
-
60
-
 61
61 -
 62
62 -
 63
63 -
 64
64 -
 65
65 -
 66
66 -
 67
67 -
 68
68 -
 69
69 -
 70
70 -
 71
71 -
72
-
73
-
74
-
75
-
76
-
77
-
78
-
79
-
80
-
81
-
82
-
83
-
84
-
85
-
86
-
87
-
88
-
89
-
90
-
91
-
92
-
93
-
94
-
95
-
96
-
97
-
98
-
99
-
100
-
101
-
102
-
103
-
104
-
105
-
106
-
107
-
108
-
109
-
110
-
111
-
112
-
113
-
114
-
115
-
116
-
117
-
118
-
119
-
120
-
121
-
122
-
123
-
124
-
125
-
126
-
127
-
128
-
129
-
130
-
131
-
132
-
133
-
134
-
135
-
136
-
137
-
138
-
139
-
140
-
141
-
142
-
143
-
144
-
145
-
146
-
147
-
148
-
149
-
150
-
151
-
152
-
153
-
154
-
155
-
156
-
157
-
158
 |
 |
