Epson Stylus Pro 7600 - UltraChrome Ink User Manual - Page 119
Color Management Settings, size of the image, printing with PhotoEnhance4 may take longer.
 |
View all Epson Stylus Pro 7600 - UltraChrome Ink manuals
Add to My Manuals
Save this manual to your list of manuals |
Page 119 highlights
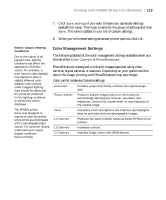
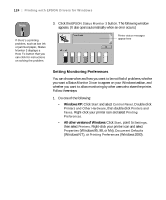
Printing with EPSON Drivers for Windows | 119 7. Click Save Settings if you want to have your advanced settings available for reuse. Then type a name for the group of settings and click Save. The name is added to your list of custom settings. 8. When you're finished setting advanced printer options, click OK. Notice: Output Viewing Conditions Color Management Settings Due to the nature of all pigment inks, lighting conditions can affect the appearance of printer output. For example, a print viewed under daylight may appear to have a slightly different color balance when viewed under tungsten lighting. Care should be taken that the prints are produced for the lighting conditions in which they will be displayed. The following tables list the color management settings available when you choose either Color Controls or PhotoEnhance4. PhotoEnhance4 is designed to enhance images captured using video cameras, digital cameras, or scanners. Depending on your system and the size of the image, printing with PhotoEnhance4 may take longer. Color control modes and Gamma settings Automatic Provides output that closely matches the original image data. Photo-realistic Produces sharper images and more vivid colors by automatically adjusting the contrast, saturation, and brightness. Corrects for overall under- or over-exposure of the original image. The EPSON printer driver was designed to represent color accurately when prints are illuminated with a D50 (daylight) light source. For optimum results, understand your output display conditions before printing. Vivid 1.5 Gamma 1.8 Gamma 2.2 Gamma Intensifies colors and lightens the midtones and highlights. Best for print jobs with non-photographic images. Produces the same contrast values as earlier EPSON ink jet printers. Increases contrast. Matches image colors with sRGB devices. 4-119
-
 1
1 -
2
-
3
-
4
-
5
-
6
-
7
-
8
-
9
-
10
-
11
-
12
-
13
-
14
-
15
-
16
-
17
-
18
-
19
-
20
-
21
-
22
-
23
-
24
-
25
-
26
-
27
-
28
-
29
-
30
-
31
-
32
-
33
-
34
-
35
-
36
-
37
-
38
-
39
-
40
-
41
-
42
-
43
-
44
-
45
-
46
-
47
-
48
-
49
-
50
-
51
-
52
-
53
-
54
-
55
-
56
-
57
-
58
-
59
-
60
-
61
-
62
-
63
-
64
-
65
-
66
-
67
-
68
-
69
-
70
-
71
-
72
-
73
-
74
-
75
-
76
-
77
-
78
-
79
-
80
-
81
-
82
-
83
-
84
-
85
-
86
-
87
-
88
-
89
-
90
-
91
-
92
-
93
-
94
-
95
-
96
-
97
-
98
-
99
-
100
-
101
-
102
-
103
-
104
-
105
-
106
-
107
-
108
-
109
-
110
-
111
-
112
-
113
-
 114
114 -
 115
115 -
 116
116 -
 117
117 -
 118
118 -
 119
119 -
 120
120 -
 121
121 -
 122
122 -
 123
123 -
 124
124 -
125
-
126
-
127
-
128
-
129
-
130
-
131
-
132
-
133
-
134
-
135
-
136
-
137
-
138
-
139
-
140
-
141
-
142
-
143
-
144
-
145
-
146
-
147
-
148
-
149
-
150
-
151
-
152
-
153
-
154
-
155
-
156
-
157
-
158
-
159
-
160
-
161
-
162
-
163
-
164
-
165
-
166
-
167
-
168
-
169
-
170
-
171
-
172
-
173
-
174
-
175
-
176
-
177
-
178
-
179
-
180
-
181
-
182
-
183
-
184
-
185
-
186
-
187
-
188
-
189
-
190
-
191
-
192
 |
 |