Epson Stylus Pro 7600 - UltraChrome Ink User Manual - Page 19
Accessories, Setting Up the Printer
 |
View all Epson Stylus Pro 7600 - UltraChrome Ink manuals
Add to My Manuals
Save this manual to your list of manuals |
Page 19 highlights
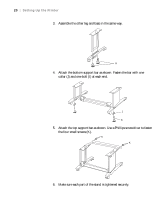
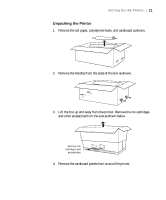
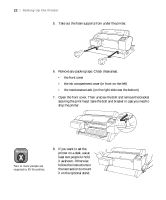
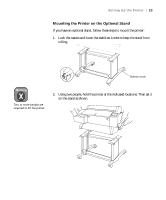
Accessories: Setting Up the Printer | 19 G H I J K L M G: Allen wrench (1) H: Bolts (4) I: Bolts (2) J: Collars (2) K: Phillips screws with washers (4) L: Wing screws (2) M: Washers (2) for attaching legs to base for attaching lower bar to legs for attaching lower bar to legs for attaching top support bar to legs for attaching printer to stand for attaching printer to stand 2. Insert one of the legs into the base as shown. (The bolt holes line up only if the leg is matched with the correct base.) Use the included Allen wrench to fasten the leg with two bolts (H). Bolt holes H 1-19 Underside view of base showing location of bolt holes
-
 1
1 -
2
-
3
-
4
-
5
-
6
-
7
-
8
-
9
-
10
-
11
-
12
-
13
-
 14
14 -
 15
15 -
 16
16 -
 17
17 -
 18
18 -
 19
19 -
 20
20 -
 21
21 -
 22
22 -
 23
23 -
 24
24 -
25
-
26
-
27
-
28
-
29
-
30
-
31
-
32
-
33
-
34
-
35
-
36
-
37
-
38
-
39
-
40
-
41
-
42
-
43
-
44
-
45
-
46
-
47
-
48
-
49
-
50
-
51
-
52
-
53
-
54
-
55
-
56
-
57
-
58
-
59
-
60
-
61
-
62
-
63
-
64
-
65
-
66
-
67
-
68
-
69
-
70
-
71
-
72
-
73
-
74
-
75
-
76
-
77
-
78
-
79
-
80
-
81
-
82
-
83
-
84
-
85
-
86
-
87
-
88
-
89
-
90
-
91
-
92
-
93
-
94
-
95
-
96
-
97
-
98
-
99
-
100
-
101
-
102
-
103
-
104
-
105
-
106
-
107
-
108
-
109
-
110
-
111
-
112
-
113
-
114
-
115
-
116
-
117
-
118
-
119
-
120
-
121
-
122
-
123
-
124
-
125
-
126
-
127
-
128
-
129
-
130
-
131
-
132
-
133
-
134
-
135
-
136
-
137
-
138
-
139
-
140
-
141
-
142
-
143
-
144
-
145
-
146
-
147
-
148
-
149
-
150
-
151
-
152
-
153
-
154
-
155
-
156
-
157
-
158
-
159
-
160
-
161
-
162
-
163
-
164
-
165
-
166
-
167
-
168
-
169
-
170
-
171
-
172
-
173
-
174
-
175
-
176
-
177
-
178
-
179
-
180
-
181
-
182
-
183
-
184
-
185
-
186
-
187
-
188
-
189
-
190
-
191
-
192
 |
 |

1-19
Setting Up the Printer
|
19
Accessories:
2.
Insert one of the legs into the base as shown. (The bolt holes line up only
if the leg is matched with the correct base.) Use the included Allen
wrench to fasten the leg with two bolts (H).
H
I
K
L
J
G
M
G:
Allen wrench (1)
H:
Bolts (4)
for attaching legs to base
I:
Bolts (2)
for attaching lower bar to legs
J:
Collars (2)
for attaching lower bar to legs
K:
Phillips screws with washers (4)
for attaching top support bar to legs
L:
Wing screws (2)
for attaching printer to stand
M:
Washers (2)
for attaching printer to stand
H
Bolt holes
Underside view of base
showing location of bolt holes