Epson Stylus Pro 7600 - UltraChrome Ink User Manual - Page 44
button or wait for 5 seconds. The paper feeds into, printing position automatically
 |
View all Epson Stylus Pro 7600 - UltraChrome Ink manuals
Add to My Manuals
Save this manual to your list of manuals |
Page 44 highlights
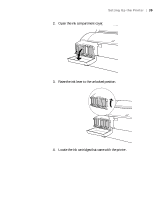
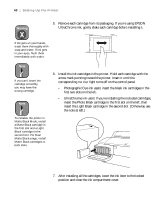
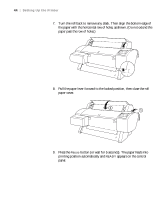
44 | Setting Up the Printer 7. Turn the roll back to remove any slack. Then align the bottom edge of the paper with the horizontal row of holes, as shown. (Do not extend the paper past the row of holes.) 8. Pull the paper lever forward to the locked position, then close the roll paper cover. 9. Press the Pause button (or wait for 5 seconds). The paper feeds into printing position automatically and READY appears on the control panel. 1-44
-
 1
1 -
2
-
3
-
4
-
5
-
6
-
7
-
8
-
9
-
10
-
11
-
12
-
13
-
14
-
15
-
16
-
17
-
18
-
19
-
20
-
21
-
22
-
23
-
24
-
25
-
26
-
27
-
28
-
29
-
30
-
31
-
32
-
33
-
34
-
35
-
36
-
37
-
38
-
 39
39 -
 40
40 -
 41
41 -
 42
42 -
 43
43 -
 44
44 -
 45
45 -
 46
46 -
 47
47 -
 48
48 -
 49
49 -
50
-
51
-
52
-
53
-
54
-
55
-
56
-
57
-
58
-
59
-
60
-
61
-
62
-
63
-
64
-
65
-
66
-
67
-
68
-
69
-
70
-
71
-
72
-
73
-
74
-
75
-
76
-
77
-
78
-
79
-
80
-
81
-
82
-
83
-
84
-
85
-
86
-
87
-
88
-
89
-
90
-
91
-
92
-
93
-
94
-
95
-
96
-
97
-
98
-
99
-
100
-
101
-
102
-
103
-
104
-
105
-
106
-
107
-
108
-
109
-
110
-
111
-
112
-
113
-
114
-
115
-
116
-
117
-
118
-
119
-
120
-
121
-
122
-
123
-
124
-
125
-
126
-
127
-
128
-
129
-
130
-
131
-
132
-
133
-
134
-
135
-
136
-
137
-
138
-
139
-
140
-
141
-
142
-
143
-
144
-
145
-
146
-
147
-
148
-
149
-
150
-
151
-
152
-
153
-
154
-
155
-
156
-
157
-
158
-
159
-
160
-
161
-
162
-
163
-
164
-
165
-
166
-
167
-
168
-
169
-
170
-
171
-
172
-
173
-
174
-
175
-
176
-
177
-
178
-
179
-
180
-
181
-
182
-
183
-
184
-
185
-
186
-
187
-
188
-
189
-
190
-
191
-
192
 |
 |

1-44
44
|
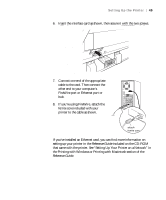
Setting Up the Printer
7.
Turn the roll back to remove any slack. Then align the bottom edge of
the paper with the horizontal row of holes, as shown. (Do not extend the
paper past the row of holes.)
8.
Pull the paper lever forward to the locked position, then close the roll
paper cover.
9.
Press the
Pause
button (or wait for 5 seconds). The paper feeds into
printing position automatically and
READY
appears on the control
panel.