Epson Stylus Pro 7600 - UltraChrome Ink User Manual - Page 26
only a short distance. Lock the casters and extend the stabilizer knobs, after moving.
 |
View all Epson Stylus Pro 7600 - UltraChrome Ink manuals
Add to My Manuals
Save this manual to your list of manuals |
Page 26 highlights
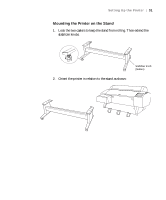
26 | Setting Up the Printer 4. Snap the connectors onto the front metal rods. 5. Check underneath the printer for packing tape. 6. Raise the stabilizer knobs and unlock the casters. Then move the printer to the place of use. (The casters are meant for moving the printer for only a short distance.) Lock the casters and extend the stabilizer knobs after moving. When done, skip ahead to "Connecting the Power Cord" on page 37. 1-26
-
 1
1 -
2
-
3
-
4
-
5
-
6
-
7
-
8
-
9
-
10
-
11
-
12
-
13
-
14
-
15
-
16
-
17
-
18
-
19
-
20
-
 21
21 -
 22
22 -
 23
23 -
 24
24 -
 25
25 -
 26
26 -
 27
27 -
 28
28 -
 29
29 -
 30
30 -
 31
31 -
32
-
33
-
34
-
35
-
36
-
37
-
38
-
39
-
40
-
41
-
42
-
43
-
44
-
45
-
46
-
47
-
48
-
49
-
50
-
51
-
52
-
53
-
54
-
55
-
56
-
57
-
58
-
59
-
60
-
61
-
62
-
63
-
64
-
65
-
66
-
67
-
68
-
69
-
70
-
71
-
72
-
73
-
74
-
75
-
76
-
77
-
78
-
79
-
80
-
81
-
82
-
83
-
84
-
85
-
86
-
87
-
88
-
89
-
90
-
91
-
92
-
93
-
94
-
95
-
96
-
97
-
98
-
99
-
100
-
101
-
102
-
103
-
104
-
105
-
106
-
107
-
108
-
109
-
110
-
111
-
112
-
113
-
114
-
115
-
116
-
117
-
118
-
119
-
120
-
121
-
122
-
123
-
124
-
125
-
126
-
127
-
128
-
129
-
130
-
131
-
132
-
133
-
134
-
135
-
136
-
137
-
138
-
139
-
140
-
141
-
142
-
143
-
144
-
145
-
146
-
147
-
148
-
149
-
150
-
151
-
152
-
153
-
154
-
155
-
156
-
157
-
158
-
159
-
160
-
161
-
162
-
163
-
164
-
165
-
166
-
167
-
168
-
169
-
170
-
171
-
172
-
173
-
174
-
175
-
176
-
177
-
178
-
179
-
180
-
181
-
182
-
183
-
184
-
185
-
186
-
187
-
188
-
189
-
190
-
191
-
192
 |
 |

1-26
26
|
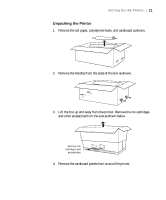
Setting Up the Printer
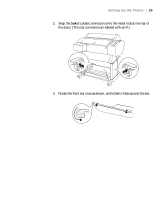
4.
Snap the connectors onto the front metal rods.
5.
Check underneath the printer for packing tape.
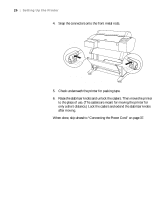
6.
Raise the stabilizer knobs and unlock the casters. Then move the printer
to the place of use. (The casters are meant for moving the printer for
only a short distance.) Lock the casters and extend the stabilizer knobs
after moving.
When done, skip ahead to “Connecting the Power Cord” on page 37.