Epson Stylus Pro 7600 - UltraChrome Ink User Manual - Page 94
custom settings list, as described in the next step, or click
 |
View all Epson Stylus Pro 7600 - UltraChrome Ink manuals
Add to My Manuals
Save this manual to your list of manuals |
Page 94 highlights
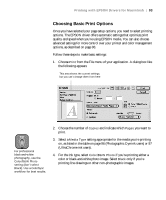
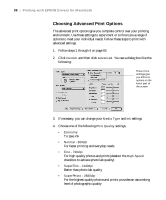
94 | Printing with EPSON Drivers for Macintosh Note You can also create your own settings and add them to this list. See page 100 for more information. 5. Set the Mode option as follows: • Click Automatic to have the printer driver analyze the contents of your image or file and make the appropriate printing adjustments. If a Quality/Speed slider appears in the Mode box, set it according to the quality required for your print job. (Depending on the Media Type setting, this slider may not appear.) • Click Custom and then choose one of the print job types from the custom settings list, as described in the next step, or click the Advanced button and see "Choosing Advanced Print Options" on page 98 for details. 6. Depending on your print mode (Automatic or Custom), you can select one of the following options from the pull-down menu: Automatic print mode Setting Usage Photo-realistic Produces sharper images and more vivid colors by automatically adjusting the contrast, saturation, and brightness. Corrects for overall under- or over-exposure of the original image. Vivid Intensifies colors and lightens the midtones and highlights. Best for print jobs with non-photographic images. Custom print mode Setting Usage Advanced Photo 2880 For smoothest color tones and highest-quality results. Advanced Photo Prevents the misprinting of ink dots that may occur because of the movement of the print head and paper. Available only when you choose photo or photo-quality media types. Text/Graph Intensifies colors and lightens the midtones and highlights. Best for print jobs with non-photographic images. ColorSync Adjusts colors based on your printer's ICC profile, using the perceptual rendering intent. 3-94
-
 1
1 -
2
-
3
-
4
-
5
-
6
-
7
-
8
-
9
-
10
-
11
-
12
-
13
-
14
-
15
-
16
-
17
-
18
-
19
-
20
-
21
-
22
-
23
-
24
-
25
-
26
-
27
-
28
-
29
-
30
-
31
-
32
-
33
-
34
-
35
-
36
-
37
-
38
-
39
-
40
-
41
-
42
-
43
-
44
-
45
-
46
-
47
-
48
-
49
-
50
-
51
-
52
-
53
-
54
-
55
-
56
-
57
-
58
-
59
-
60
-
61
-
62
-
63
-
64
-
65
-
66
-
67
-
68
-
69
-
70
-
71
-
72
-
73
-
74
-
75
-
76
-
77
-
78
-
79
-
80
-
81
-
82
-
83
-
84
-
85
-
86
-
87
-
88
-
 89
89 -
 90
90 -
 91
91 -
 92
92 -
 93
93 -
 94
94 -
 95
95 -
 96
96 -
 97
97 -
 98
98 -
 99
99 -
100
-
101
-
102
-
103
-
104
-
105
-
106
-
107
-
108
-
109
-
110
-
111
-
112
-
113
-
114
-
115
-
116
-
117
-
118
-
119
-
120
-
121
-
122
-
123
-
124
-
125
-
126
-
127
-
128
-
129
-
130
-
131
-
132
-
133
-
134
-
135
-
136
-
137
-
138
-
139
-
140
-
141
-
142
-
143
-
144
-
145
-
146
-
147
-
148
-
149
-
150
-
151
-
152
-
153
-
154
-
155
-
156
-
157
-
158
-
159
-
160
-
161
-
162
-
163
-
164
-
165
-
166
-
167
-
168
-
169
-
170
-
171
-
172
-
173
-
174
-
175
-
176
-
177
-
178
-
179
-
180
-
181
-
182
-
183
-
184
-
185
-
186
-
187
-
188
-
189
-
190
-
191
-
192
 |
 |