Epson Stylus Pro 7600 - UltraChrome Ink User Manual - Page 133
Cleaning the Print Head from the Control Panel
 |
View all Epson Stylus Pro 7600 - UltraChrome Ink manuals
Add to My Manuals
Save this manual to your list of manuals |
Page 133 highlights
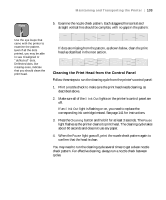
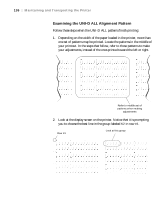
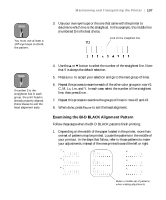
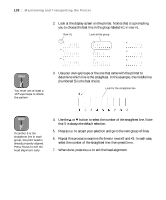
Maintaining and Transporting the Printer | 133 Note 5. Examine the nozzle check pattern. Each staggered horizontal and straight vertical line should be complete, with no gaps in the pattern: Use the eye loupe that came with the printer to examine the pattern. Even if all the dots printed, you may be able to see misaligned or "deflected" dots. Deflected dots, like missing ones, indicate that you should clean the print head. If dots are missing from the pattern, as shown below, clean the print head as described in the next section. Cleaning the Print Head from the Control Panel Follow these steps to run the cleaning cycle from the printer's control panel: 1. Print a nozzle check to make sure the print head needs cleaning, as described above. 2. Make sure all of the H Ink Out lights on the printer's control panel are off. If an H Ink Out light is flashing or on, you need to replace the corresponding ink cartridge instead. See page 141 for instructions. 3. Press the Cleaning button and hold it for at least 3 seconds. The Pause light flashes as the printer cleans its print head. The cleaning cycle takes about 60 seconds and does not use any paper. 4. When the Pause light goes off, print the nozzle check pattern again to confirm that the head is clean. You may need to run the cleaning cycle several times to get a clean nozzle check pattern. For effective cleaning, always run a nozzle check between cycles. 5-133
-
 1
1 -
2
-
3
-
4
-
5
-
6
-
7
-
8
-
9
-
10
-
11
-
12
-
13
-
14
-
15
-
16
-
17
-
18
-
19
-
20
-
21
-
22
-
23
-
24
-
25
-
26
-
27
-
28
-
29
-
30
-
31
-
32
-
33
-
34
-
35
-
36
-
37
-
38
-
39
-
40
-
41
-
42
-
43
-
44
-
45
-
46
-
47
-
48
-
49
-
50
-
51
-
52
-
53
-
54
-
55
-
56
-
57
-
58
-
59
-
60
-
61
-
62
-
63
-
64
-
65
-
66
-
67
-
68
-
69
-
70
-
71
-
72
-
73
-
74
-
75
-
76
-
77
-
78
-
79
-
80
-
81
-
82
-
83
-
84
-
85
-
86
-
87
-
88
-
89
-
90
-
91
-
92
-
93
-
94
-
95
-
96
-
97
-
98
-
99
-
100
-
101
-
102
-
103
-
104
-
105
-
106
-
107
-
108
-
109
-
110
-
111
-
112
-
113
-
114
-
115
-
116
-
117
-
118
-
119
-
120
-
121
-
122
-
123
-
124
-
125
-
126
-
127
-
 128
128 -
 129
129 -
 130
130 -
 131
131 -
 132
132 -
 133
133 -
 134
134 -
 135
135 -
 136
136 -
 137
137 -
 138
138 -
139
-
140
-
141
-
142
-
143
-
144
-
145
-
146
-
147
-
148
-
149
-
150
-
151
-
152
-
153
-
154
-
155
-
156
-
157
-
158
-
159
-
160
-
161
-
162
-
163
-
164
-
165
-
166
-
167
-
168
-
169
-
170
-
171
-
172
-
173
-
174
-
175
-
176
-
177
-
178
-
179
-
180
-
181
-
182
-
183
-
184
-
185
-
186
-
187
-
188
-
189
-
190
-
191
-
192
 |
 |
