Epson Stylus Pro 7600 - UltraChrome Ink User Manual - Page 86
When done, press the, The following settings are available
 |
View all Epson Stylus Pro 7600 - UltraChrome Ink manuals
Add to My Manuals
Save this manual to your list of manuals |
Page 86 highlights
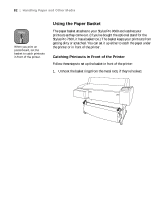
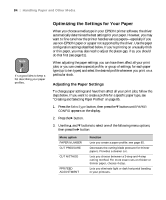
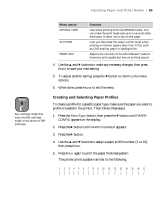
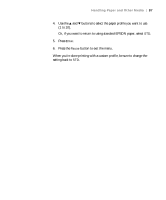
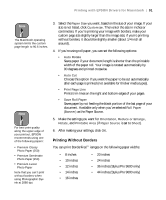
86 | Handling Paper and Other Media 6. Examine the printed pattern for the most evenly overlapping lines. In the example shown above, the lines under number 4 are the most even. 7. Use the u and d buttons to display the selected line number, then press Enter to save your new setting. 8. The menu options shown below appear in sequence. Make any adjustments, as needed, and press Enter to save each setting. The following settings are available: Menu option CUT PRESSURE CUT METHOD PPR FEED ADJUSTMENT DRYING TIME SUCTION PRINT ADJ Function Decreases the cutting blade pressure for thinner papers. Provides a cleaner cut. Lets you choose between a 3-step and 4-step cutting method. For more exact cuts on thicker or thinner paper, choose 4-step. Lets you eliminate light or dark horizontal banding in your printouts. When set to 0, the EPSON driver adjusts the paper feed automatically. Use when printing with non-EPSON media. You can make the print head wait up to 5 seconds after each pass to allow ink to dry on the page. Lets you decrease the paper suction level when printing on thinner papers (less than 12 lb), such as CAD drafting paper or backlight film. Adjusts the intensity of the MicroWeave pattern. Improves print quality but lowers printing speed. 9. When done, press the Pause button. Once you have created a paper profile, you can select it whenever you print on that paper: 1. Press the SelecType button, then press the d button until PAPER CONFIG appears on the display. 2. Press the r button until PAPER NUMBER appears. 3. Press the r button. 2-86
-
 1
1 -
2
-
3
-
4
-
5
-
6
-
7
-
8
-
9
-
10
-
11
-
12
-
13
-
14
-
15
-
16
-
17
-
18
-
19
-
20
-
21
-
22
-
23
-
24
-
25
-
26
-
27
-
28
-
29
-
30
-
31
-
32
-
33
-
34
-
35
-
36
-
37
-
38
-
39
-
40
-
41
-
42
-
43
-
44
-
45
-
46
-
47
-
48
-
49
-
50
-
51
-
52
-
53
-
54
-
55
-
56
-
57
-
58
-
59
-
60
-
61
-
62
-
63
-
64
-
65
-
66
-
67
-
68
-
69
-
70
-
71
-
72
-
73
-
74
-
75
-
76
-
77
-
78
-
79
-
80
-
 81
81 -
 82
82 -
 83
83 -
 84
84 -
 85
85 -
 86
86 -
 87
87 -
 88
88 -
 89
89 -
 90
90 -
 91
91 -
92
-
93
-
94
-
95
-
96
-
97
-
98
-
99
-
100
-
101
-
102
-
103
-
104
-
105
-
106
-
107
-
108
-
109
-
110
-
111
-
112
-
113
-
114
-
115
-
116
-
117
-
118
-
119
-
120
-
121
-
122
-
123
-
124
-
125
-
126
-
127
-
128
-
129
-
130
-
131
-
132
-
133
-
134
-
135
-
136
-
137
-
138
-
139
-
140
-
141
-
142
-
143
-
144
-
145
-
146
-
147
-
148
-
149
-
150
-
151
-
152
-
153
-
154
-
155
-
156
-
157
-
158
-
159
-
160
-
161
-
162
-
163
-
164
-
165
-
166
-
167
-
168
-
169
-
170
-
171
-
172
-
173
-
174
-
175
-
176
-
177
-
178
-
179
-
180
-
181
-
182
-
183
-
184
-
185
-
186
-
187
-
188
-
189
-
190
-
191
-
192
 |
 |