HP 3390 Service Manual - Page 225
Control-panel messages, Alert and warning messages, Table 6-1
 |
View all HP 3390 manuals
Add to My Manuals
Save this manual to your list of manuals |
Page 225 highlights
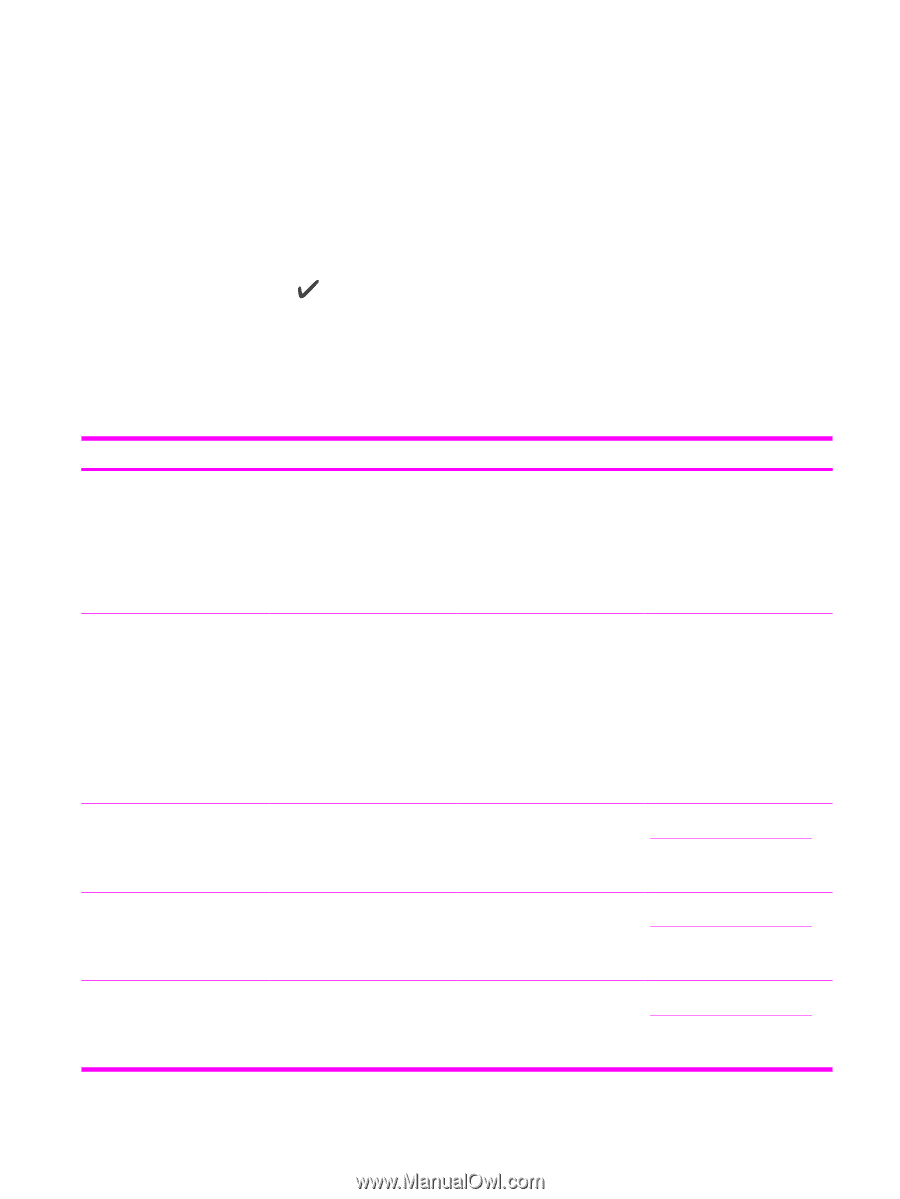
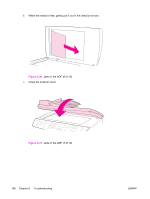
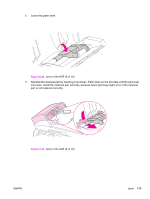
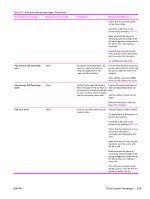
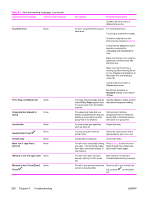
Control-panel messages The control-panel messages indicate the status of the current operation, and include a page count on the second line of the display, if appropriate. When the all-in-one is receiving fax data, print data, or scanning commands, the control-panel messages indicate this status. In addition, alert messages, warning messages, and critical-error messages indicate situations that might require some action Alert and warning messages Alert and warning messages appear temporarily and might require the user to acknowledge the message by pressing to resume or by pressing Cancel to cancel the job. With certain warnings, the job might not be completed or the print-quality might be affected. If the alert or warning message is related to printing and the auto-continue feature is on, the all-in-one will attempt to resume the printing job after the warning has appeared for 10 seconds without acknowledgement. Alert and warning message tables Table 6-1 Alert and warning messages Event-log error message 10.XXXX ADF door is open Canceled copy. Clear document Canceled scan. Clear document Canceled send. Clear document Control panel message 10.0000; black e-label error 10.1000; black e-label missing 10.3000; non-HP black 10.3100; non-HP cloned black 10.3200; unauthorized black None None None None Description Recommended action The print cartridge is not installed 1. correctly. 2. Reinstall the print cartridge. Power-cycle all-in-one. 3. If the problem is not solved, replace the cartridge. The ADF cover is open or a sensor is malfunctioning. Make sure that the ADF cover is closed. Remove the ADF and reinstall it. If the message persists, turn off the power by using the power switch, wait at least 30 seconds, and then turn on the power and wait for the all-in-one to initialize. Try another power source. The Cancel button was pressed to cancel the current job while pages were feeding from the ADF. The cancel process does not automatically clear the ADF. Remove the jammed item. See Jams in the ADF on page 195. Then, clear the items in the ADF tray and start over. The Cancel button was pressed to cancel the current job while pages were feeding from the ADF. The cancel process does not automatically clear the ADF. Remove the jammed item. See Jams in the ADF on page 195. Then, clear the items in the ADF tray and start over. The Cancel button was pressed to cancel the current job while pages were feeding from the ADF tray. The cancel process does not automatically clear the ADF. Remove the jammed item. See Jams in the ADF on page 195. Then, clear the items in the ADF tray and start over. ENWW Control-panel messages 203
-
 1
1 -
2
-
3
-
4
-
5
-
6
-
7
-
8
-
9
-
10
-
11
-
12
-
13
-
14
-
15
-
16
-
17
-
18
-
19
-
20
-
21
-
22
-
23
-
24
-
25
-
26
-
27
-
28
-
29
-
30
-
31
-
32
-
33
-
34
-
35
-
36
-
37
-
38
-
39
-
40
-
41
-
42
-
43
-
44
-
45
-
46
-
47
-
48
-
49
-
50
-
51
-
52
-
53
-
54
-
55
-
56
-
57
-
58
-
59
-
60
-
61
-
62
-
63
-
64
-
65
-
66
-
67
-
68
-
69
-
70
-
71
-
72
-
73
-
74
-
75
-
76
-
77
-
78
-
79
-
80
-
81
-
82
-
83
-
84
-
85
-
86
-
87
-
88
-
89
-
90
-
91
-
92
-
93
-
94
-
95
-
96
-
97
-
98
-
99
-
100
-
101
-
102
-
103
-
104
-
105
-
106
-
107
-
108
-
109
-
110
-
111
-
112
-
113
-
114
-
115
-
116
-
117
-
118
-
119
-
120
-
121
-
122
-
123
-
124
-
125
-
126
-
127
-
128
-
129
-
130
-
131
-
132
-
133
-
134
-
135
-
136
-
137
-
138
-
139
-
140
-
141
-
142
-
143
-
144
-
145
-
146
-
147
-
148
-
149
-
150
-
151
-
152
-
153
-
154
-
155
-
156
-
157
-
158
-
159
-
160
-
161
-
162
-
163
-
164
-
165
-
166
-
167
-
168
-
169
-
170
-
171
-
172
-
173
-
174
-
175
-
176
-
177
-
178
-
179
-
180
-
181
-
182
-
183
-
184
-
185
-
186
-
187
-
188
-
189
-
190
-
191
-
192
-
193
-
194
-
195
-
196
-
197
-
198
-
199
-
200
-
201
-
202
-
203
-
204
-
205
-
206
-
207
-
208
-
209
-
210
-
211
-
212
-
213
-
214
-
215
-
216
-
217
-
218
-
219
-
 220
220 -
 221
221 -
 222
222 -
 223
223 -
 224
224 -
 225
225 -
 226
226 -
 227
227 -
 228
228 -
 229
229 -
 230
230 -
231
-
232
-
233
-
234
-
235
-
236
-
237
-
238
-
239
-
240
-
241
-
242
-
243
-
244
-
245
-
246
-
247
-
248
-
249
-
250
-
251
-
252
-
253
-
254
-
255
-
256
-
257
-
258
-
259
-
260
-
261
-
262
-
263
-
264
-
265
-
266
-
267
-
268
-
269
-
270
-
271
-
272
-
273
-
274
-
275
-
276
-
277
-
278
-
279
-
280
-
281
-
282
-
283
-
284
-
285
-
286
-
287
-
288
-
289
-
290
-
291
-
292
-
293
-
294
-
295
-
296
-
297
-
298
-
299
-
300
-
301
-
302
-
303
-
304
-
305
-
306
-
307
-
308
-
309
-
310
-
311
-
312
-
313
-
314
-
315
-
316
-
317
-
318
-
319
-
320
-
321
-
322
-
323
-
324
-
325
-
326
-
327
-
328
-
329
-
330
-
331
-
332
-
333
-
334
-
335
-
336
-
337
-
338
-
339
-
340
-
341
-
342
-
343
-
344
-
345
-
346
-
347
-
348
-
349
-
350
-
351
-
352
-
353
-
354
-
355
-
356
-
357
-
358
-
359
-
360
-
361
-
362
-
363
-
364
 |
 |