HP 3390 Service Manual - Page 95
Group name, Add/Edit, Select, New/Edit, Group, Delete, Next empty row, Import Phone Book
 |
View all HP 3390 manuals
Add to My Manuals
Save this manual to your list of manuals |
Page 95 highlights
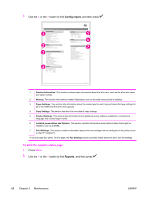
3. Double-click a contact name from the list on the left to move it to the group list on the right, or select a name on the left and then click the appropriate arrow to move it to the group list on the right. You can also use those two methods to move names from right to left. 4. When you have created a group, type a name in the Group name window, and then click OK. ● To edit an existing individual speed-dial entry: 1. Click anywhere on the row that contains the contact name to select it. 2. Type changes in the appropriate windows, and then click Add/Edit. You can also make changes directly in the phone book directory list by clicking the entry and typing your changes. Make sure that you do not have a check mark in the Select column. ● To edit an existing group-speed-dial entry: 1. Click anywhere on the row containing the group name to select it, and then click New/Edit Group. 2. Make any required changes, and then click OK. You can make changes to the name of the group directly in the phone book directory list by clicking the entry and typing your changes. Make sure that you do not have a check mark in the Select column. ● To delete an entry from the speed-dial list: Select the item and then click Delete. ● To move speed-dial entries: 1. Select the entry and then click Move, or you can select Move and then specify the entry in the dialog box. 2. Select Next empty row, or specify the number of the row where you want to move the entry. NOTE If you specify a row that is occupied, the new entry will overwrite the existing entry. ● To import contacts from a phone book that exists in Lotus Notes, Outlook, or Outlook Express: 1. Click Import Phone Book. 2. Select the appropriate software program, navigate to the appropriate file, and then click OK. You can also select individual entries from the phone book instead of importing the entire phone book. ● To select all of the entries in your speed-dial list: Click the Select column heading. In addition to numerical digits, the following are valid characters for fax numbers ENWW Using the HP ToolboxFX 73
-
 1
1 -
2
-
3
-
4
-
5
-
6
-
7
-
8
-
9
-
10
-
11
-
12
-
13
-
14
-
15
-
16
-
17
-
18
-
19
-
20
-
21
-
22
-
23
-
24
-
25
-
26
-
27
-
28
-
29
-
30
-
31
-
32
-
33
-
34
-
35
-
36
-
37
-
38
-
39
-
40
-
41
-
42
-
43
-
44
-
45
-
46
-
47
-
48
-
49
-
50
-
51
-
52
-
53
-
54
-
55
-
56
-
57
-
58
-
59
-
60
-
61
-
62
-
63
-
64
-
65
-
66
-
67
-
68
-
69
-
70
-
71
-
72
-
73
-
74
-
75
-
76
-
77
-
78
-
79
-
80
-
81
-
82
-
83
-
84
-
85
-
86
-
87
-
88
-
89
-
 90
90 -
 91
91 -
 92
92 -
 93
93 -
 94
94 -
 95
95 -
 96
96 -
 97
97 -
 98
98 -
 99
99 -
 100
100 -
101
-
102
-
103
-
104
-
105
-
106
-
107
-
108
-
109
-
110
-
111
-
112
-
113
-
114
-
115
-
116
-
117
-
118
-
119
-
120
-
121
-
122
-
123
-
124
-
125
-
126
-
127
-
128
-
129
-
130
-
131
-
132
-
133
-
134
-
135
-
136
-
137
-
138
-
139
-
140
-
141
-
142
-
143
-
144
-
145
-
146
-
147
-
148
-
149
-
150
-
151
-
152
-
153
-
154
-
155
-
156
-
157
-
158
-
159
-
160
-
161
-
162
-
163
-
164
-
165
-
166
-
167
-
168
-
169
-
170
-
171
-
172
-
173
-
174
-
175
-
176
-
177
-
178
-
179
-
180
-
181
-
182
-
183
-
184
-
185
-
186
-
187
-
188
-
189
-
190
-
191
-
192
-
193
-
194
-
195
-
196
-
197
-
198
-
199
-
200
-
201
-
202
-
203
-
204
-
205
-
206
-
207
-
208
-
209
-
210
-
211
-
212
-
213
-
214
-
215
-
216
-
217
-
218
-
219
-
220
-
221
-
222
-
223
-
224
-
225
-
226
-
227
-
228
-
229
-
230
-
231
-
232
-
233
-
234
-
235
-
236
-
237
-
238
-
239
-
240
-
241
-
242
-
243
-
244
-
245
-
246
-
247
-
248
-
249
-
250
-
251
-
252
-
253
-
254
-
255
-
256
-
257
-
258
-
259
-
260
-
261
-
262
-
263
-
264
-
265
-
266
-
267
-
268
-
269
-
270
-
271
-
272
-
273
-
274
-
275
-
276
-
277
-
278
-
279
-
280
-
281
-
282
-
283
-
284
-
285
-
286
-
287
-
288
-
289
-
290
-
291
-
292
-
293
-
294
-
295
-
296
-
297
-
298
-
299
-
300
-
301
-
302
-
303
-
304
-
305
-
306
-
307
-
308
-
309
-
310
-
311
-
312
-
313
-
314
-
315
-
316
-
317
-
318
-
319
-
320
-
321
-
322
-
323
-
324
-
325
-
326
-
327
-
328
-
329
-
330
-
331
-
332
-
333
-
334
-
335
-
336
-
337
-
338
-
339
-
340
-
341
-
342
-
343
-
344
-
345
-
346
-
347
-
348
-
349
-
350
-
351
-
352
-
353
-
354
-
355
-
356
-
357
-
358
-
359
-
360
-
361
-
362
-
363
-
364
 |
 |