HP 3390 Service Manual - Page 234
Identifying and correcting print defects, Print-quality checklist, General print-quality issues
 |
View all HP 3390 manuals
Add to My Manuals
Save this manual to your list of manuals |
Page 234 highlights
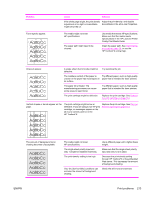
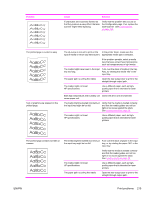
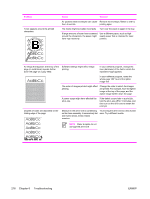
3. Click Properties, or click Printing Preferences. 4. Change the settings, and click OK. Identifying and correcting print defects Use the checklist and print-quality issues charts in this section to solve print-quality problems. Print-quality checklist General print-quality problems can be solved by using the following checklist: 1. Make sure that the paper or print media that you are using meets specifications. Generally, smoother paper provides better results. 2. If you are using a special print media such as labels, transparencies, glossy paper, or letterhead, ensure that you have printed by type. 3. Print a Configuration page and Supplies Status page at the all-in-one control panel. ● Check the Supplies Status page to see if any supplies are low or empty. No information is provided for non-HP print cartridges. 4. Print a Demo page from the HP ToolboxFX. If the page prints, the problem is with the printer driver. Try printing from another printer driver. For example, if you are using the PCL 6 printer driver, print from the PS printer driver. ● Use the Add Printer Wizard in the Printers (or Printers and Faxes in Windows XP) dialog box to install the PS driver. 5. Try printing from a different program. If the page prints correctly, the problem is with the program from which you were printing. 6. Restart the computer and the all-in-one and try printing again. If the problem is not resolved, see General print-quality issues on page 212. General print-quality issues The following examples depict letter-size paper that has passed through the all-in-one short-edge-first. These examples illustrate problems that would affect all of the pages that you print. The topics that follow list the typical cause and solution for each of these examples. Problem Print is light or faded. Cause Solution The media might not meet HP specifications. Use media that meets HP specifications. Make sure that the media meets specifications in the HP LaserJet Printer Family Print Media Guide. The print cartridge might be low. If you use a non-HP print cartridge, no messages appear on the all-in-one control panel or in the HP ToolboxFX. Replace the print cartridge. See Remove the print cartridge on page 113. If the print cartridge is not low or empty, inspect the transfer roller to see if it is damaged. If it is not , replace the print cartridge. 212 Chapter 6 Troubleshooting ENWW
-
 1
1 -
2
-
3
-
4
-
5
-
6
-
7
-
8
-
9
-
10
-
11
-
12
-
13
-
14
-
15
-
16
-
17
-
18
-
19
-
20
-
21
-
22
-
23
-
24
-
25
-
26
-
27
-
28
-
29
-
30
-
31
-
32
-
33
-
34
-
35
-
36
-
37
-
38
-
39
-
40
-
41
-
42
-
43
-
44
-
45
-
46
-
47
-
48
-
49
-
50
-
51
-
52
-
53
-
54
-
55
-
56
-
57
-
58
-
59
-
60
-
61
-
62
-
63
-
64
-
65
-
66
-
67
-
68
-
69
-
70
-
71
-
72
-
73
-
74
-
75
-
76
-
77
-
78
-
79
-
80
-
81
-
82
-
83
-
84
-
85
-
86
-
87
-
88
-
89
-
90
-
91
-
92
-
93
-
94
-
95
-
96
-
97
-
98
-
99
-
100
-
101
-
102
-
103
-
104
-
105
-
106
-
107
-
108
-
109
-
110
-
111
-
112
-
113
-
114
-
115
-
116
-
117
-
118
-
119
-
120
-
121
-
122
-
123
-
124
-
125
-
126
-
127
-
128
-
129
-
130
-
131
-
132
-
133
-
134
-
135
-
136
-
137
-
138
-
139
-
140
-
141
-
142
-
143
-
144
-
145
-
146
-
147
-
148
-
149
-
150
-
151
-
152
-
153
-
154
-
155
-
156
-
157
-
158
-
159
-
160
-
161
-
162
-
163
-
164
-
165
-
166
-
167
-
168
-
169
-
170
-
171
-
172
-
173
-
174
-
175
-
176
-
177
-
178
-
179
-
180
-
181
-
182
-
183
-
184
-
185
-
186
-
187
-
188
-
189
-
190
-
191
-
192
-
193
-
194
-
195
-
196
-
197
-
198
-
199
-
200
-
201
-
202
-
203
-
204
-
205
-
206
-
207
-
208
-
209
-
210
-
211
-
212
-
213
-
214
-
215
-
216
-
217
-
218
-
219
-
220
-
221
-
222
-
223
-
224
-
225
-
226
-
227
-
228
-
 229
229 -
 230
230 -
 231
231 -
 232
232 -
 233
233 -
 234
234 -
 235
235 -
 236
236 -
 237
237 -
 238
238 -
 239
239 -
240
-
241
-
242
-
243
-
244
-
245
-
246
-
247
-
248
-
249
-
250
-
251
-
252
-
253
-
254
-
255
-
256
-
257
-
258
-
259
-
260
-
261
-
262
-
263
-
264
-
265
-
266
-
267
-
268
-
269
-
270
-
271
-
272
-
273
-
274
-
275
-
276
-
277
-
278
-
279
-
280
-
281
-
282
-
283
-
284
-
285
-
286
-
287
-
288
-
289
-
290
-
291
-
292
-
293
-
294
-
295
-
296
-
297
-
298
-
299
-
300
-
301
-
302
-
303
-
304
-
305
-
306
-
307
-
308
-
309
-
310
-
311
-
312
-
313
-
314
-
315
-
316
-
317
-
318
-
319
-
320
-
321
-
322
-
323
-
324
-
325
-
326
-
327
-
328
-
329
-
330
-
331
-
332
-
333
-
334
-
335
-
336
-
337
-
338
-
339
-
340
-
341
-
342
-
343
-
344
-
345
-
346
-
347
-
348
-
349
-
350
-
351
-
352
-
353
-
354
-
355
-
356
-
357
-
358
-
359
-
360
-
361
-
362
-
363
-
364
 |
 |