HP CP1518ni HP Color LaserJet CP1510 Series - Software Technical Reference - Page 309
Macintosh readme, Hewlett-Packard Color LaserJet CP1510 Series Install Notes
 |
UPC - 883585140633
View all HP CP1518ni manuals
Add to My Manuals
Save this manual to your list of manuals |
Page 309 highlights
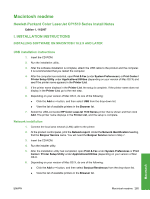
Macintosh readme Hewlett-Packard Color LaserJet CP1510 Series Install Notes Edition 1, 11/2007 I. INSTALLATION INSTRUCTIONS INSTALLING SOFTWARE ON MACINTOSH 10.2.X AND LATER USB installation instructions 1. Insert the CD-ROM. 2. Run the installation utility. 3. After the software installation is complete, attach the USB cable to the product and the computer. It is recommended that you restart the computer. 4. After the computer has restarted, open Print & Fax (under System Preferences), or Print Center / Printer Setup Utility under Applications/Utilities (depending on your version of Mac OS X) and see if the printer name appears in the Printer List. 5. If the printer name displays in the Printer List, the setup is complete. If the printer name does not display in the Printer List, go to the next step. 6. Depending on your version of Mac OS X, do one of the following: ● Click the Add or + button, and then select USB from the drop-down list. ● View the list of available printers in the Browser list. 7. Select the USB-connected HP Color LaserJet 1510 Series printer that is shown and then click Add. The printer name displays in the Printer List, and the setup is complete. Network installation 1. Connect the local area network (LAN) cable to the printer. 2. At the product control panel, print the Network report. Under the Network Identification heading, find the Bonjour Service name. You will need the Bonjour Service name in Step 7. 3. Insert the CD-ROM. 4. Run the installer utility. 5. After the installation utility had completed, open Print & Fax under System Preferences or Print Center / Printer Setup Utility under Applications/Utilities (depending on your version of Mac OS X. 6. Depending on your version of Mac OS X, do one of the following: ● Click the Add or + button, and then select Bonjour/Rendevous from the drop-down list. ● View the list of available printers in the Browser list. Macintosh ENWW Macintosh readme 285
-
 1
1 -
2
-
3
-
4
-
5
-
6
-
7
-
8
-
9
-
10
-
11
-
12
-
13
-
14
-
15
-
16
-
17
-
18
-
19
-
20
-
21
-
22
-
23
-
24
-
25
-
26
-
27
-
28
-
29
-
30
-
31
-
32
-
33
-
34
-
35
-
36
-
37
-
38
-
39
-
40
-
41
-
42
-
43
-
44
-
45
-
46
-
47
-
48
-
49
-
50
-
51
-
52
-
53
-
54
-
55
-
56
-
57
-
58
-
59
-
60
-
61
-
62
-
63
-
64
-
65
-
66
-
67
-
68
-
69
-
70
-
71
-
72
-
73
-
74
-
75
-
76
-
77
-
78
-
79
-
80
-
81
-
82
-
83
-
84
-
85
-
86
-
87
-
88
-
89
-
90
-
91
-
92
-
93
-
94
-
95
-
96
-
97
-
98
-
99
-
100
-
101
-
102
-
103
-
104
-
105
-
106
-
107
-
108
-
109
-
110
-
111
-
112
-
113
-
114
-
115
-
116
-
117
-
118
-
119
-
120
-
121
-
122
-
123
-
124
-
125
-
126
-
127
-
128
-
129
-
130
-
131
-
132
-
133
-
134
-
135
-
136
-
137
-
138
-
139
-
140
-
141
-
142
-
143
-
144
-
145
-
146
-
147
-
148
-
149
-
150
-
151
-
152
-
153
-
154
-
155
-
156
-
157
-
158
-
159
-
160
-
161
-
162
-
163
-
164
-
165
-
166
-
167
-
168
-
169
-
170
-
171
-
172
-
173
-
174
-
175
-
176
-
177
-
178
-
179
-
180
-
181
-
182
-
183
-
184
-
185
-
186
-
187
-
188
-
189
-
190
-
191
-
192
-
193
-
194
-
195
-
196
-
197
-
198
-
199
-
200
-
201
-
202
-
203
-
204
-
205
-
206
-
207
-
208
-
209
-
210
-
211
-
212
-
213
-
214
-
215
-
216
-
217
-
218
-
219
-
220
-
221
-
222
-
223
-
224
-
225
-
226
-
227
-
228
-
229
-
230
-
231
-
232
-
233
-
234
-
235
-
236
-
237
-
238
-
239
-
240
-
241
-
242
-
243
-
244
-
245
-
246
-
247
-
248
-
249
-
250
-
251
-
252
-
253
-
254
-
255
-
256
-
257
-
258
-
259
-
260
-
261
-
262
-
263
-
264
-
265
-
266
-
267
-
268
-
269
-
270
-
271
-
272
-
273
-
274
-
275
-
276
-
277
-
278
-
279
-
280
-
281
-
282
-
283
-
284
-
285
-
286
-
287
-
288
-
289
-
290
-
291
-
292
-
293
-
294
-
295
-
296
-
297
-
298
-
299
-
300
-
301
-
302
-
303
-
 304
304 -
 305
305 -
 306
306 -
 307
307 -
 308
308 -
 309
309 -
 310
310 -
 311
311 -
 312
312 -
 313
313 -
 314
314 -
315
-
316
-
317
-
318
-
319
-
320
-
321
-
322
-
323
-
324
-
325
-
326
-
327
-
328
-
329
-
330
-
331
-
332
-
333
-
334
-
335
-
336
-
337
-
338
-
339
-
340
 |
 |