HP F4280 User Guide - Page 125
Solution 1: Place the original correctly on the glass, Solution 2: Clean the scanner glass
 |
UPC - 883585581313
View all HP F4280 manuals
Add to My Manuals
Save this manual to your list of manuals |
Page 125 highlights
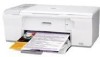
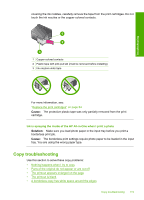
Troubleshooting Solution 1: Place the original correctly on the glass Solution: Load your original print side down on the right front corner of the glass. Cause: The original was placed incorrectly on the glass. If this did not solve the issue, try the next solution. Solution 2: Clean the scanner glass Solution: Clean the scanner glass and make sure that there are no foreign materials adhering to it. For more information, see "Clean the glass" on page 59. Cause: The scanner glass was dirty, causing the product to include an area in the copy that was larger than the document. The printout appears enlarged on the page Solution: Ensure that your Copy settings are chosen correctly. If the problem persists, debris might be stuck on the glass or on the back of the document lid. This can cause the product to detect only a portion of the image. Turn off the product, unplug the power cord, and use a soft cloth to wipe the glass and the back of the document lid. For more information, see: • "Clean the lid backing" on page 60 • "Clean the glass" on page 59 Cause: The product detected only a portion of the image due to dust or debris on the glass. Copy troubleshooting 123
-
 1
1 -
2
-
3
-
4
-
5
-
6
-
7
-
8
-
9
-
10
-
11
-
12
-
13
-
14
-
15
-
16
-
17
-
18
-
19
-
20
-
21
-
22
-
23
-
24
-
25
-
26
-
27
-
28
-
29
-
30
-
31
-
32
-
33
-
34
-
35
-
36
-
37
-
38
-
39
-
40
-
41
-
42
-
43
-
44
-
45
-
46
-
47
-
48
-
49
-
50
-
51
-
52
-
53
-
54
-
55
-
56
-
57
-
58
-
59
-
60
-
61
-
62
-
63
-
64
-
65
-
66
-
67
-
68
-
69
-
70
-
71
-
72
-
73
-
74
-
75
-
76
-
77
-
78
-
79
-
80
-
81
-
82
-
83
-
84
-
85
-
86
-
87
-
88
-
89
-
90
-
91
-
92
-
93
-
94
-
95
-
96
-
97
-
98
-
99
-
100
-
101
-
102
-
103
-
104
-
105
-
106
-
107
-
108
-
109
-
110
-
111
-
112
-
113
-
114
-
115
-
116
-
117
-
118
-
119
-
 120
120 -
 121
121 -
 122
122 -
 123
123 -
 124
124 -
 125
125 -
 126
126 -
 127
127 -
 128
128 -
 129
129 -
 130
130 -
131
-
132
-
133
-
134
-
135
-
136
-
137
-
138
-
139
-
140
-
141
-
142
-
143
-
144
-
145
-
146
-
147
-
148
-
149
-
150
-
151
-
152
-
153
-
154
-
155
-
156
-
157
-
158
-
159
-
160
-
161
-
162
-
163
-
164
-
165
-
166
-
167
-
168
-
169
-
170
-
171
-
172
-
173
-
174
-
175
-
176
-
177
-
178
-
179
-
180
-
181
-
182
-
183
-
184
-
185
-
186
-
187
-
188
-
189
-
190
-
191
-
192
-
193
-
194
-
195
-
196
-
197
-
198
-
199
-
200
-
201
-
202
-
203
-
204
-
205
-
206
-
207
-
208
-
209
-
210
-
211
-
212
-
213
-
214
-
215
-
216
-
217
-
218
-
219
-
220
 |
 |
