HP F4280 User Guide - Page 185
To disconnect and reset the product, Cause, Solution
 |
UPC - 883585581313
View all HP F4280 manuals
Add to My Manuals
Save this manual to your list of manuals |
Page 185 highlights
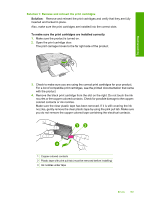
Troubleshooting b. Check for any paper still in the product. Gently pull any paper out of the rollers. c. Replace the rear access door. Gently push the door forward until it snaps into place. 6. Do one of the following, depending upon the state of the product: • If the On button light is on and steady, print a self-test report. If you can print a self-test report, the carriage is no longer jammed. For more information, see "Print a self-test report" on page 61. • If the On button light is not on or is flashing and the print carriage is still stalled, proceed to the next solution. 7. Disconnect and reset the product. To disconnect and reset the product a. Make sure the product is turned on. b. Press the On button to turn off the product. c. Disconnect the power cord from the back of the product. d. Reconnect the power cord to the back of the product. e. Press the On to turn on the product. Cause: The print carriage was blocked by a paper jam. If this did not solve the issue, try the next solution. Solution 3: Check the power source Solution: Verify that the product is properly connected to a suitable power source. To verify that the product is connected to a suitable power source 1. Verify that the product has a two-prong power plug, and make sure you are using the power cord provided with the product. 2. If the product is connected to a computer, make sure the computer has the correct power plug depending on your country/region. 3. Make sure the power cord is firmly connected to both the product and the power adaptor. Errors 183
-
 1
1 -
2
-
3
-
4
-
5
-
6
-
7
-
8
-
9
-
10
-
11
-
12
-
13
-
14
-
15
-
16
-
17
-
18
-
19
-
20
-
21
-
22
-
23
-
24
-
25
-
26
-
27
-
28
-
29
-
30
-
31
-
32
-
33
-
34
-
35
-
36
-
37
-
38
-
39
-
40
-
41
-
42
-
43
-
44
-
45
-
46
-
47
-
48
-
49
-
50
-
51
-
52
-
53
-
54
-
55
-
56
-
57
-
58
-
59
-
60
-
61
-
62
-
63
-
64
-
65
-
66
-
67
-
68
-
69
-
70
-
71
-
72
-
73
-
74
-
75
-
76
-
77
-
78
-
79
-
80
-
81
-
82
-
83
-
84
-
85
-
86
-
87
-
88
-
89
-
90
-
91
-
92
-
93
-
94
-
95
-
96
-
97
-
98
-
99
-
100
-
101
-
102
-
103
-
104
-
105
-
106
-
107
-
108
-
109
-
110
-
111
-
112
-
113
-
114
-
115
-
116
-
117
-
118
-
119
-
120
-
121
-
122
-
123
-
124
-
125
-
126
-
127
-
128
-
129
-
130
-
131
-
132
-
133
-
134
-
135
-
136
-
137
-
138
-
139
-
140
-
141
-
142
-
143
-
144
-
145
-
146
-
147
-
148
-
149
-
150
-
151
-
152
-
153
-
154
-
155
-
156
-
157
-
158
-
159
-
160
-
161
-
162
-
163
-
164
-
165
-
166
-
167
-
168
-
169
-
170
-
171
-
172
-
173
-
174
-
175
-
176
-
177
-
178
-
179
-
 180
180 -
 181
181 -
 182
182 -
 183
183 -
 184
184 -
 185
185 -
 186
186 -
 187
187 -
 188
188 -
 189
189 -
 190
190 -
191
-
192
-
193
-
194
-
195
-
196
-
197
-
198
-
199
-
200
-
201
-
202
-
203
-
204
-
205
-
206
-
207
-
208
-
209
-
210
-
211
-
212
-
213
-
214
-
215
-
216
-
217
-
218
-
219
-
220
 |
 |
