HP F4280 User Guide - Page 184
If the print carriage is stuck on the left side
 |
UPC - 883585581313
View all HP F4280 manuals
Add to My Manuals
Save this manual to your list of manuals |
Page 184 highlights
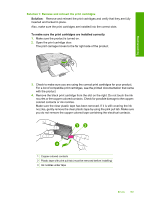
Troubleshooting Chapter 12 3. If the print carriage did not move, open the front access door, and make note of where the carriage is stuck and look for jammed paper. A paper jam can cause the error message and the print carriage to stall. CAUTION: Do not use any tools or other devices to remove jammed paper. Always use caution when removing jammed paper from inside the product. If the print carriage is stuck on the right side a. Check for any paper or object that might be restricting the print carriage. b. Move the print carriage all the way to the left side. c. Check the paper path all the way to the right side and remove any paper still in the product. If the print carriage is stuck on the left side a. Check for any paper or object that may be restricting the print carriage. b. Move the print carriage all the way to the right side. c. Check the paper path all the way to the left side and remove any paper still in the product. If the print carriage is stuck in the middle a. Check for any paper or object that may be restricting the print carriage. b. Move the print carriage all the way to the left side. c. Check the paper path all the way to the right side and remove any paper still in the product. d. Move the print carriage all the way to the right side. e. Check the paper path all the way to the left side and remove any paper still in the product. 4. Close the front access door. 5. Check for a paper jam in the rear access door. To check for a paper jam in the rear access door a. Press in the tab on the rear access door to release the door. Remove the door by pulling it away from the product. 182 Troubleshooting
-
 1
1 -
2
-
3
-
4
-
5
-
6
-
7
-
8
-
9
-
10
-
11
-
12
-
13
-
14
-
15
-
16
-
17
-
18
-
19
-
20
-
21
-
22
-
23
-
24
-
25
-
26
-
27
-
28
-
29
-
30
-
31
-
32
-
33
-
34
-
35
-
36
-
37
-
38
-
39
-
40
-
41
-
42
-
43
-
44
-
45
-
46
-
47
-
48
-
49
-
50
-
51
-
52
-
53
-
54
-
55
-
56
-
57
-
58
-
59
-
60
-
61
-
62
-
63
-
64
-
65
-
66
-
67
-
68
-
69
-
70
-
71
-
72
-
73
-
74
-
75
-
76
-
77
-
78
-
79
-
80
-
81
-
82
-
83
-
84
-
85
-
86
-
87
-
88
-
89
-
90
-
91
-
92
-
93
-
94
-
95
-
96
-
97
-
98
-
99
-
100
-
101
-
102
-
103
-
104
-
105
-
106
-
107
-
108
-
109
-
110
-
111
-
112
-
113
-
114
-
115
-
116
-
117
-
118
-
119
-
120
-
121
-
122
-
123
-
124
-
125
-
126
-
127
-
128
-
129
-
130
-
131
-
132
-
133
-
134
-
135
-
136
-
137
-
138
-
139
-
140
-
141
-
142
-
143
-
144
-
145
-
146
-
147
-
148
-
149
-
150
-
151
-
152
-
153
-
154
-
155
-
156
-
157
-
158
-
159
-
160
-
161
-
162
-
163
-
164
-
165
-
166
-
167
-
168
-
169
-
170
-
171
-
172
-
173
-
174
-
175
-
176
-
177
-
178
-
 179
179 -
 180
180 -
 181
181 -
 182
182 -
 183
183 -
 184
184 -
 185
185 -
 186
186 -
 187
187 -
 188
188 -
 189
189 -
190
-
191
-
192
-
193
-
194
-
195
-
196
-
197
-
198
-
199
-
200
-
201
-
202
-
203
-
204
-
205
-
206
-
207
-
208
-
209
-
210
-
211
-
212
-
213
-
214
-
215
-
216
-
217
-
218
-
219
-
220
 |
 |
