HP OmniBook 500 HP OmniBook 500 (FA) - Corporate Evaluator's Guide Edition 4 - Page 108
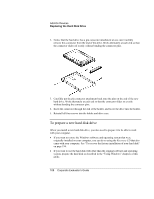
To prepare a new hard disk drive
 |
View all HP OmniBook 500 manuals
Add to My Manuals
Save this manual to your list of manuals |
Page 108 highlights
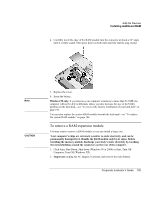
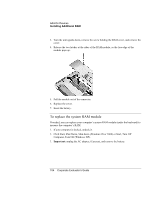
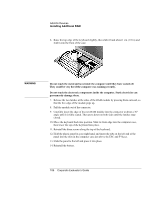
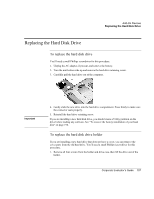
Add-On Devices Replacing the Hard Disk Drive 2. Notice that the hard drive has a pin connector attachment at one end. Carefully remove this connector from the end of the drive. Work alternately at each end so that the connector slides off evenly without bending the connector pins. 3. Carefully put the pin connector attachment back onto the pins on the end of the new hard drive. Work alternately at each end so that the connector slides on evenly without bending the connector pins. 4. Insert the connector through the end of the holder, and lower the drive into the holder. 5. Reinstall all four screws into the holder and drive case. To prepare a new hard disk drive When you install a new hard disk drive, you also need to prepare it to be able to work with your computer. • If you want to restore the Windows software and operating system that were originally installed on your computer, you can do so using the Recovery CD that also came with your computer. See "To recover the factory installation of your hard disk" on page 196. • If you want to use the hard disk with other than the original software and operating system, prepare the hard disk as described in the "Using Windows" chapters of this guide. 108 Corporate Evaluator's Guide
-
 1
1 -
2
-
3
-
4
-
5
-
6
-
7
-
8
-
9
-
10
-
11
-
12
-
13
-
14
-
15
-
16
-
17
-
18
-
19
-
20
-
21
-
22
-
23
-
24
-
25
-
26
-
27
-
28
-
29
-
30
-
31
-
32
-
33
-
34
-
35
-
36
-
37
-
38
-
39
-
40
-
41
-
42
-
43
-
44
-
45
-
46
-
47
-
48
-
49
-
50
-
51
-
52
-
53
-
54
-
55
-
56
-
57
-
58
-
59
-
60
-
61
-
62
-
63
-
64
-
65
-
66
-
67
-
68
-
69
-
70
-
71
-
72
-
73
-
74
-
75
-
76
-
77
-
78
-
79
-
80
-
81
-
82
-
83
-
84
-
85
-
86
-
87
-
88
-
89
-
90
-
91
-
92
-
93
-
94
-
95
-
96
-
97
-
98
-
99
-
100
-
101
-
102
-
 103
103 -
 104
104 -
 105
105 -
 106
106 -
 107
107 -
 108
108 -
 109
109 -
 110
110 -
 111
111 -
 112
112 -
 113
113 -
114
-
115
-
116
-
117
-
118
-
119
-
120
-
121
-
122
-
123
-
124
-
125
-
126
-
127
-
128
-
129
-
130
-
131
-
132
-
133
-
134
-
135
-
136
-
137
-
138
-
139
-
140
-
141
-
142
-
143
-
144
-
145
-
146
-
147
-
148
-
149
-
150
-
151
-
152
-
153
-
154
-
155
-
156
-
157
-
158
-
159
-
160
-
161
-
162
-
163
-
164
-
165
-
166
-
167
-
168
-
169
-
170
-
171
-
172
-
173
-
174
-
175
-
176
-
177
-
178
-
179
-
180
-
181
-
182
-
183
-
184
-
185
-
186
-
187
-
188
-
189
-
190
-
191
-
192
-
193
-
194
-
195
-
196
-
197
-
198
-
199
-
200
-
201
-
202
-
203
-
204
-
205
-
206
-
207
-
208
-
209
-
210
-
211
-
212
-
213
-
214
-
215
-
216
-
217
-
218
-
219
-
220
-
221
-
222
-
223
-
224
-
225
-
226
-
227
-
228
-
229
-
230
-
231
-
232
-
233
-
234
-
235
 |
 |
