HP Pavilion a200 HP Pavilion Desktop PCs - (English) Quick Start Guide SEA/ANZ - Page 12
Multi-Storage Bay - Peripheral Placement Continued
 |
View all HP Pavilion a200 manuals
Add to My Manuals
Save this manual to your list of manuals |
Page 12 highlights
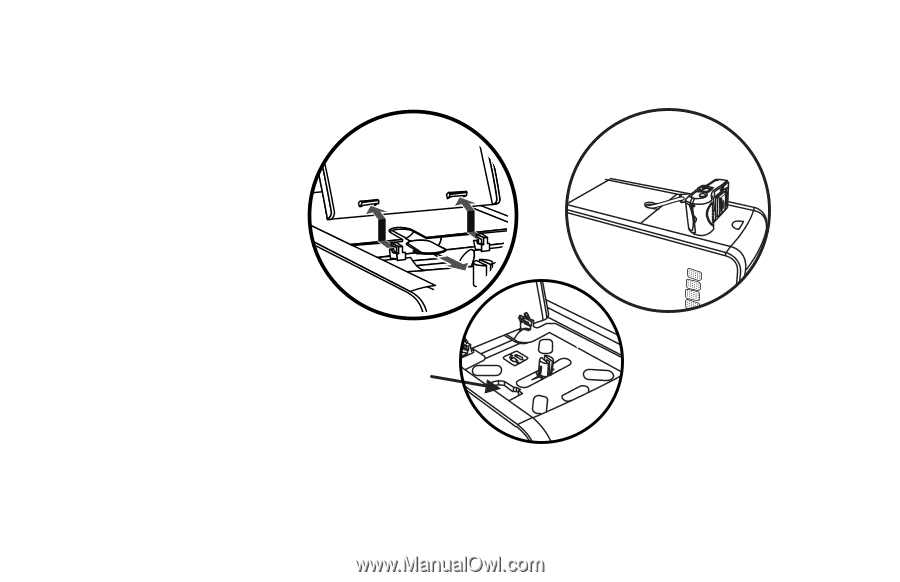
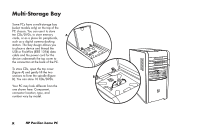
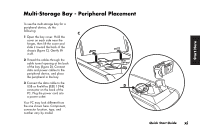
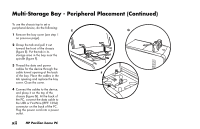
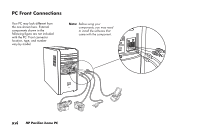
Multi-Storage Bay - Peripheral Placement (Continued) To use the chassis top to set a peripheral device, do the following: E 1 Remove the bay cover (see step 1 on previous page). 2 Grasp the tab and pull it out toward the front of the chassis (figure E). Put the tab in its storage area in the bay near the spindle (figure F). 3 Thread the data and power cables for the device through the cable tunnel opening at the back of the bay. Place the cables in the tab opening and replace the bay cover. Close the cover. 4 Connect the cables to the device, and place it on the top of the chassis (figure G). At the back of the PC, connect the data cable to the USB or FireWire (IEEE 1394) connector on the back of the PC. Plug the power cord into a power outlet. G F xii HP Pavilion home PC
-
 1
1 -
2
-
3
-
4
-
5
-
6
-
 7
7 -
 8
8 -
 9
9 -
 10
10 -
 11
11 -
 12
12 -
 13
13 -
 14
14 -
 15
15 -
 16
16 -
 17
17 -
18
-
19
-
20
-
21
-
22
-
23
-
24
-
25
-
26
-
27
-
28
-
29
-
30
-
31
-
32
-
33
-
34
-
35
-
36
-
37
-
38
-
39
-
40
-
41
-
42
-
43
-
44
-
45
-
46
-
47
-
48
-
49
-
50
-
51
-
52
-
53
-
54
-
55
-
56
-
57
-
58
-
59
-
60
-
61
-
62
-
63
-
64
-
65
-
66
-
67
-
68
-
69
-
70
-
71
-
72
-
73
-
74
-
75
-
76
-
77
-
78
-
79
-
80
-
81
-
82
-
83
-
84
-
85
-
86
-
87
-
88
-
89
-
90
-
91
-
92
-
93
-
94
-
95
-
96
-
97
-
98
-
99
-
100
-
101
-
102
-
103
-
104
-
105
-
106
-
107
-
108
-
109
-
110
-
111
-
112
-
113
-
114
-
115
-
116
-
117
-
118
-
119
-
120
-
121
-
122
-
123
-
124
-
125
-
126
-
127
-
128
-
129
-
130
-
131
-
132
-
133
-
134
-
135
-
136
-
137
-
138
-
139
-
140
-
141
-
142
-
143
-
144
-
145
-
146
-
147
-
148
 |
 |