HP Pavilion a200 HP Pavilion Desktop PCs - (English) Quick Start Guide SEA/ANZ - Page 91
Special note about the Safely, Remove Hardware Utility, To use the 6-In-1, memory card reader
 |
View all HP Pavilion a200 manuals
Add to My Manuals
Save this manual to your list of manuals |
Page 91 highlights
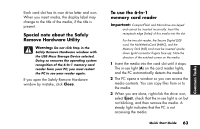
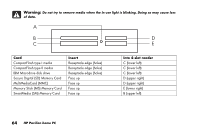
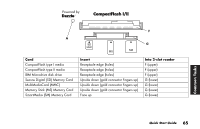
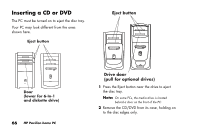
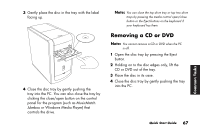
Each card slot has its own drive letter and icon. When you insert media, the display label may change to the title of the media, if the title is present. Special note about the Safely Remove Hardware Utility Warning: Do not click Stop in the Safely Remove Hardware window with the USB Mass Storage Device selected. Doing so removes the operating system recognition of the 6-In-1 memory card reader from your PC; you must restart the PC to see your reader again. If you open the Safely Remove Hardware window by mistake, click Close. To use the 6-In-1 memory card reader Important: CompactFlash and Microdrive are keyed and cannot be inserted incorrectly. Insert the receptacle edge (holes) of this media into the slot. For the two-slot reader, the Secure Digital (SD) card, the MultiMediaCard (MMC), and the Memory Stick (MS) card must be inserted upside down (gold connector fingers face up). Note the direction of the notched corner on the media. 1 Insert the media into the card slot until it stops. The in-use light (A) on the card reader lights, and the PC automatically detects the media. 2 The PC opens a window so you can access the media contents. You can copy files from or to the media. 3 When you are done, right-click the drive icon, select Eject, check that the in-use light is on but not blinking, and then remove the media. A steady light indicates that the PC is not accessing the media. Quick Start Guide 63 Common Tasks
-
 1
1 -
2
-
3
-
4
-
5
-
6
-
7
-
8
-
9
-
10
-
11
-
12
-
13
-
14
-
15
-
16
-
17
-
18
-
19
-
20
-
21
-
22
-
23
-
24
-
25
-
26
-
27
-
28
-
29
-
30
-
31
-
32
-
33
-
34
-
35
-
36
-
37
-
38
-
39
-
40
-
41
-
42
-
43
-
44
-
45
-
46
-
47
-
48
-
49
-
50
-
51
-
52
-
53
-
54
-
55
-
56
-
57
-
58
-
59
-
60
-
61
-
62
-
63
-
64
-
65
-
66
-
67
-
68
-
69
-
70
-
71
-
72
-
73
-
74
-
75
-
76
-
77
-
78
-
79
-
80
-
81
-
82
-
83
-
84
-
85
-
 86
86 -
 87
87 -
 88
88 -
 89
89 -
 90
90 -
 91
91 -
 92
92 -
 93
93 -
 94
94 -
 95
95 -
 96
96 -
97
-
98
-
99
-
100
-
101
-
102
-
103
-
104
-
105
-
106
-
107
-
108
-
109
-
110
-
111
-
112
-
113
-
114
-
115
-
116
-
117
-
118
-
119
-
120
-
121
-
122
-
123
-
124
-
125
-
126
-
127
-
128
-
129
-
130
-
131
-
132
-
133
-
134
-
135
-
136
-
137
-
138
-
139
-
140
-
141
-
142
-
143
-
144
-
145
-
146
-
147
-
148
 |
 |
