HP ProLiant xw2x220c Remote Graphics Software 5.3.0 User Guide - Page 81
Local Computer Desktop, Remote, Display, Window
 |
View all HP ProLiant xw2x220c manuals
Add to My Manuals
Save this manual to your list of manuals |
Page 81 highlights
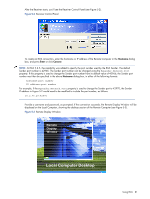
After the Receiver starts, you'll see the Receiver Control Panel (see Figure 5-2). Figure 5-2 Receiver Control Panel To create an RGS connection, enter the hostname or IP address of the Remote Computer in the Hostname dialog box, and press Enter or click Connect. NOTE: At RGS 5.2.5, the capability was added to specify the port number used by the RGS Sender. The default Sender port number is 42966. The Sender port number can be changed using the Rgsender.Network.Port property. If this property is used to change the Sender port number from its default value of 42966, the Sender port number must then be specified in the above Hostname dialog box, in either of the following formats: hostname:port number IP address:port number For example, if the Rgsender.Network.Port property is used to change the Sender port to 42970, the Sender IP address in Figure 5-2 would need to be modified to include the port number, as follows: 15.2.76.29:42970 Provide a username and password, as prompted. If the connection succeeds, the Remote Display Window will be displayed on the Local Computer, showing the desktop session of the Remote Computer (see Figure 5-3). Figure 5-3 Remote Display Window ReRmeomteote Display Window Display Window LocLaol cCaolmCpoumtepruDteersDketospktop Using RGS 81
-
 1
1 -
2
-
3
-
4
-
5
-
6
-
7
-
8
-
9
-
10
-
11
-
12
-
13
-
14
-
15
-
16
-
17
-
18
-
19
-
20
-
21
-
22
-
23
-
24
-
25
-
26
-
27
-
28
-
29
-
30
-
31
-
32
-
33
-
34
-
35
-
36
-
37
-
38
-
39
-
40
-
41
-
42
-
43
-
44
-
45
-
46
-
47
-
48
-
49
-
50
-
51
-
52
-
53
-
54
-
55
-
56
-
57
-
58
-
59
-
60
-
61
-
62
-
63
-
64
-
65
-
66
-
67
-
68
-
69
-
70
-
71
-
72
-
73
-
74
-
75
-
 76
76 -
 77
77 -
 78
78 -
 79
79 -
 80
80 -
 81
81 -
 82
82 -
 83
83 -
 84
84 -
 85
85 -
 86
86 -
87
-
88
-
89
-
90
-
91
-
92
-
93
-
94
-
95
-
96
-
97
-
98
-
99
-
100
-
101
-
102
-
103
-
104
-
105
-
106
-
107
-
108
-
109
-
110
-
111
-
112
-
113
-
114
-
115
-
116
-
117
-
118
-
119
-
120
-
121
-
122
-
123
-
124
-
125
-
126
-
127
-
128
-
129
-
130
-
131
-
132
-
133
-
134
-
135
-
136
-
137
-
138
-
139
-
140
-
141
-
142
-
143
-
144
-
145
-
146
-
147
-
148
-
149
-
150
-
151
-
152
-
153
-
154
-
155
-
156
-
157
-
158
-
159
-
160
-
161
-
162
-
163
-
164
-
165
-
166
-
167
-
168
-
169
-
170
-
171
-
172
-
173
-
174
-
175
-
176
-
177
-
178
-
179
-
180
-
181
-
182
-
183
-
184
-
185
-
186
-
187
-
188
-
189
-
190
-
191
-
192
-
193
-
194
-
195
-
196
 |
 |
