HP Scitex LX600 HP Designjet L65500 Printer and HP Scitex LX Printer Family - - Page 17
Lift the printer to a second floor using a crane, Site Preparation Guide
 |
View all HP Scitex LX600 manuals
Add to My Manuals
Save this manual to your list of manuals |
Page 17 highlights
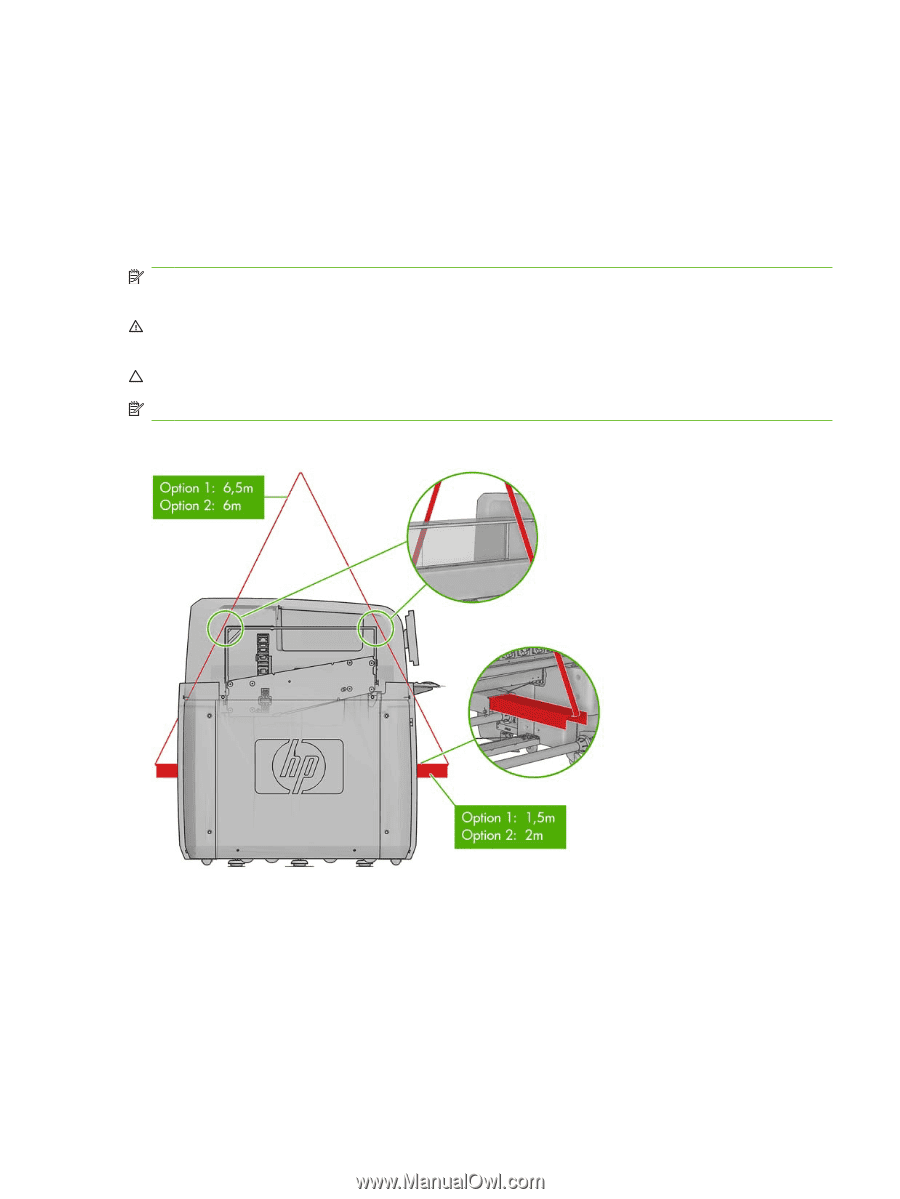
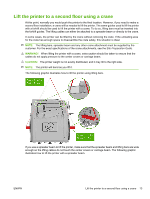
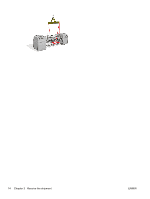
Lift the printer to a second floor using a crane At this point, normally you would push the printer to the final location. However, if you need to make a second floor installation, a crane will be needed to lift the printer. The same guides used to lift the printer with a forklift should be used to lift the printer with a crane. To do so, lifting bars must be inserted into the forklift guides. The lifting cables can either be attached to a spreader beam or directly to the crane. In some cases, the printer can be lifted by the crane without removing the crate. If the unloading area for the crate has enough space to disassemble the crate safely, this situation is ideal. NOTE: The lifting bars, spreader beam and any other crane attachment must be supplied by the customer. For the exact specifications of the crane attachments, see the Site Preparation Guide. WARNING! When lifting the printer with a crane, extra caution should be taken to ensure that the cables do not apply pressure to the center covers or carriage beam. CAUTION: The printer weight is not evenly distributed, and it may tilt to the right side. NOTE: The printer will bend as you lift it. The following graphic illustrates how to lift the printer using lifting bars. If you use a spreader beam to lift the printer, make sure that the spreader beam and lifting bars are wide enough so the lifting cables do not touch the center covers or carriage beam. The following graphic illustrates how to lift the printer with a spreader beam. ENWW Lift the printer to a second floor using a crane 13
-
 1
1 -
2
-
3
-
4
-
5
-
6
-
7
-
8
-
9
-
10
-
11
-
 12
12 -
 13
13 -
 14
14 -
 15
15 -
 16
16 -
 17
17 -
 18
18 -
 19
19 -
 20
20 -
 21
21 -
 22
22 -
23
-
24
-
25
-
26
-
27
-
28
-
29
-
30
-
31
-
32
-
33
-
34
-
35
-
36
-
37
-
38
-
39
-
40
-
41
-
42
-
43
-
44
-
45
-
46
-
47
-
48
-
49
-
50
-
51
-
52
-
53
-
54
-
55
-
56
-
57
-
58
-
59
-
60
-
61
-
62
-
63
-
64
-
65
-
66
-
67
-
68
-
69
-
70
-
71
-
72
-
73
-
74
-
75
-
76
-
77
-
78
-
79
-
80
-
81
-
82
-
83
-
84
-
85
-
86
 |
 |