HP Scitex LX600 HP Designjet L65500 Printer and HP Scitex LX Printer Family - - Page 65
After lifting the printhead cover
 |
View all HP Scitex LX600 manuals
Add to My Manuals
Save this manual to your list of manuals |
Page 65 highlights
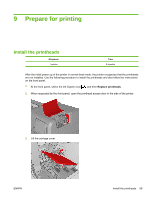
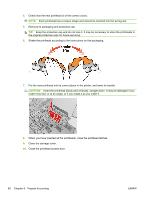
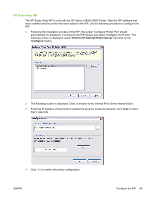
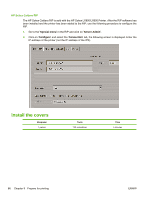
If a printhead fails to work correctly, try the following recommendations. 1. Use the procedures in the Service Manual, described under "Large ink area missing or substantial horizontal banding". 2. Request a hard clean of the printhead, and illuminate the space between the printheads and the printhead cleaning roll while the printhead is being cleaned. ● Check that the primer is working correctly (first step of the hard cleaning): big dots should form under the printhead. ● Check that static spitting is functioning correctly (second step, seen as 'heavy rain'). 3. Inspect the ink deposited on the printhead cleaning roll during printhead cleaning. You should see a large area saturated with ink, followed by a pattern of smaller areas of ink. If the large saturated area is missing, the primer is not working. If the primer is not working: 1. Go to the front panel and start the process to replace the printhead in question. 2. After lifting the printhead cover, you will see two 'O' rings that seal the joints between the printhead cover and the printhead. Apply a little oil, grease or water to the 'O' rings to improve their performance. 3. Check the primer's electrical connections. 4. Close the printhead cover, the carriage cover and the printhead access door. 5. Request a hard clean of the printhead. ENWW Install the printheads 61
-
 1
1 -
2
-
3
-
4
-
5
-
6
-
7
-
8
-
9
-
10
-
11
-
12
-
13
-
14
-
15
-
16
-
17
-
18
-
19
-
20
-
21
-
22
-
23
-
24
-
25
-
26
-
27
-
28
-
29
-
30
-
31
-
32
-
33
-
34
-
35
-
36
-
37
-
38
-
39
-
40
-
41
-
42
-
43
-
44
-
45
-
46
-
47
-
48
-
49
-
50
-
51
-
52
-
53
-
54
-
55
-
56
-
57
-
58
-
59
-
 60
60 -
 61
61 -
 62
62 -
 63
63 -
 64
64 -
 65
65 -
 66
66 -
 67
67 -
 68
68 -
 69
69 -
 70
70 -
71
-
72
-
73
-
74
-
75
-
76
-
77
-
78
-
79
-
80
-
81
-
82
-
83
-
84
-
85
-
86
 |
 |