HP Scitex LX600 HP Designjet L65500 Printer and HP Scitex LX Printer Family - - Page 51
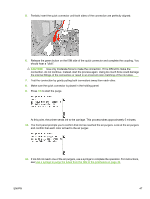
At this point, the printer sends ink to the carriage. This process takes approximately 5 minutes.
 |
View all HP Scitex LX600 manuals
Add to My Manuals
Save this manual to your list of manuals |
Page 51 highlights
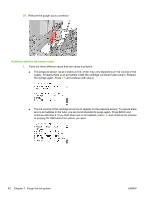
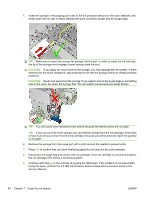
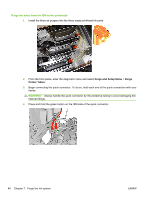
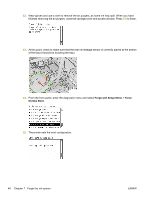
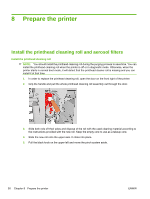
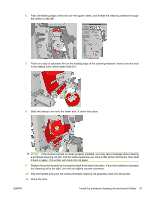
5. Partially insert the quick connector until both sides of the connection are perfectly aligned. 6. Release the green button on the ISM side of the quick connector and complete the coupling. You should hear a "click". CAUTION: Use only moderate force to make the connection. If it is difficult to make the connection, do not continue. Instead, start the process again. Using too much force could damage the internal fittings of the connectors or result in an incorrect color matching of the ink tubes. 7. Test the connection by gently pulling both connectors away from each other. 8. Make sure the quick connector is placed in the holding panel. 9. Press OK to start the purge. At this point, the printer sends ink to the carriage. This process takes approximately 5 minutes. 10. The front panel prompts you to confirm that ink has reached the air purgers. Look at the air purgers and confirm that each color arrived to the air purger. 11. If ink did not reach one of the air purgers, use a syringe to complete the operation. For instructions, see Use a syringe to purge the tubes from the ISM to the printheads on page 49. ENWW 47
-
 1
1 -
2
-
3
-
4
-
5
-
6
-
7
-
8
-
9
-
10
-
11
-
12
-
13
-
14
-
15
-
16
-
17
-
18
-
19
-
20
-
21
-
22
-
23
-
24
-
25
-
26
-
27
-
28
-
29
-
30
-
31
-
32
-
33
-
34
-
35
-
36
-
37
-
38
-
39
-
40
-
41
-
42
-
43
-
44
-
45
-
 46
46 -
 47
47 -
 48
48 -
 49
49 -
 50
50 -
 51
51 -
 52
52 -
 53
53 -
 54
54 -
 55
55 -
 56
56 -
57
-
58
-
59
-
60
-
61
-
62
-
63
-
64
-
65
-
66
-
67
-
68
-
69
-
70
-
71
-
72
-
73
-
74
-
75
-
76
-
77
-
78
-
79
-
80
-
81
-
82
-
83
-
84
-
85
-
86
 |
 |
