HP Scitex LX600 HP Designjet L65500 Printer and HP Scitex LX Printer Family - - Page 42
CAUTION, Ink Supply Legend, Purge and Setup Menu, Purge ISM
 |
View all HP Scitex LX600 manuals
Add to My Manuals
Save this manual to your list of manuals |
Page 42 highlights
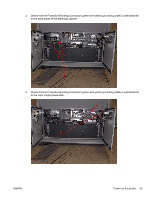
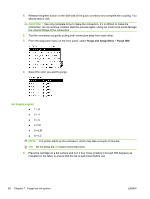
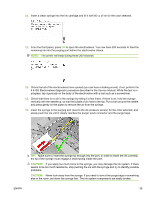
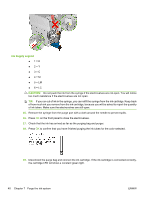
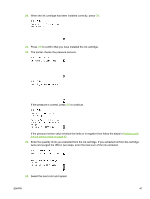
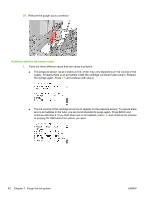
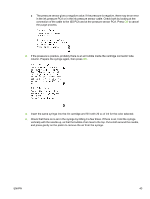
5. Release the green button on the ISM side of the quick connector and complete the coupling. You should hear a click. CAUTION: Use only moderate force to make the connection. If it is difficult to make the connection, do not continue. Instead, start the process again. Using too much force could damage the internal fittings of the connectors. 6. Test the connection by gently pulling both connectors away from each other. 7. From the diagnostic menu on the front panel, select Purge and Setup Menu > Purge ISM. 8. Select the color you want to purge. Ink Supply Legend ● 1=K ● 2=Y ● 3=C ● 4=M ● 5 = LM ● 6 = LC NOTE: The printer starts up the procedure, which may take a couple of minutes. TIP: Do not press the OK button more than once. 9. Place the cartridge on a flat surface and turn it four times (rotating it through 360 degrees) as indicated on the label, to ensure that the ink is well mixed before use. 38 Chapter 7 Purge the ink system ENWW
-
 1
1 -
2
-
3
-
4
-
5
-
6
-
7
-
8
-
9
-
10
-
11
-
12
-
13
-
14
-
15
-
16
-
17
-
18
-
19
-
20
-
21
-
22
-
23
-
24
-
25
-
26
-
27
-
28
-
29
-
30
-
31
-
32
-
33
-
34
-
35
-
36
-
 37
37 -
 38
38 -
 39
39 -
 40
40 -
 41
41 -
 42
42 -
 43
43 -
 44
44 -
 45
45 -
 46
46 -
 47
47 -
48
-
49
-
50
-
51
-
52
-
53
-
54
-
55
-
56
-
57
-
58
-
59
-
60
-
61
-
62
-
63
-
64
-
65
-
66
-
67
-
68
-
69
-
70
-
71
-
72
-
73
-
74
-
75
-
76
-
77
-
78
-
79
-
80
-
81
-
82
-
83
-
84
-
85
-
86
 |
 |