Icom ID-52A Advanced Manual english - Page 258
Download procedures (Android device), When using a USB cable, USB Serialport Function, USB Connect
 |
View all Icom ID-52A manuals
Add to My Manuals
Save this manual to your list of manuals |
Page 258 highlights
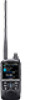
17 OPTIONS When using an application DDDownload procedures (Android device) 1. Turn ON your Android device. 2. Touch "Play Store." 3. Enter the application's name in the search field. LLDo not abbreviate the application name to be sure to find it. 4. Touch The application's name will be displayed as the search result. LLIf your Android device does not support the application, its name may not appear on the search result. 5. Touch the application to install. •• Displays the introduction screen of the application. 6. Touch . •• Installation starts. •• After finishing the installation, the icon is displayed on the screen. DDDownload procedures (iOS device) 1. Turn ON your iOS device. 2. Touch "App Store." 3. Enter the application's name in the search field. LLDo not abbreviate the application name to be sure to find it. 4. Touch The application's name will be displayed as the search result. LLIf your iOS device does not support the application, its name may not appear on the search result. 5. Touch the application to install. •• Displays the introduction screen of the application. 6. Touch . •• Installation starts. •• After finishing the installation, the icon is displayed on the screen. DDWhen using a USB cable ID-52A/E Android device with the USB host function USB cable To the [USB] port To a USB port LLConnect the USB micro-B connector (for the OPC-2417: with the white tube) to the transceiver and the other connector to an Android device. NOTE: •• Turn OFF the transceiver before connecting or removing the cable. •• When an Android device is connected, the USB connection indicator ( ) is displayed on the transceiver. If the indicator is not displayed, enable your Android device to detect the USB device. LLNo operation is required on a mobile device that support automatic detection of the USB devices. •• When using RS-MS1A, confirm the following items are set. ([MENU] > SET > Function > CI-V) Set "CI-V Address" to the value same as the RS-MS1A side. (Default: A6) LLRS-MS1A side: Application Settings → CI-V settings (Default: Transceiver[A6]) Set "CI-V Transceive" to "ON." ([MENU] > SET > Function > USB Serialport Function) Set "USB SerialPort Function" to "CI-V (Echo Back OFF)." ([MENU] > SET > Function > USB Connect) Set "USB Connect" to "Serialport." •• When using Access Point mode, RS-MS1A cannot be used. •• Remove the USB cable when you do not use the cable. Otherwise, the battery will be quickly exhausted. 17-6
-
 1
1 -
2
-
3
-
4
-
5
-
6
-
7
-
8
-
9
-
10
-
11
-
12
-
13
-
14
-
15
-
16
-
17
-
18
-
19
-
20
-
21
-
22
-
23
-
24
-
25
-
26
-
27
-
28
-
29
-
30
-
31
-
32
-
33
-
34
-
35
-
36
-
37
-
38
-
39
-
40
-
41
-
42
-
43
-
44
-
45
-
46
-
47
-
48
-
49
-
50
-
51
-
52
-
53
-
54
-
55
-
56
-
57
-
58
-
59
-
60
-
61
-
62
-
63
-
64
-
65
-
66
-
67
-
68
-
69
-
70
-
71
-
72
-
73
-
74
-
75
-
76
-
77
-
78
-
79
-
80
-
81
-
82
-
83
-
84
-
85
-
86
-
87
-
88
-
89
-
90
-
91
-
92
-
93
-
94
-
95
-
96
-
97
-
98
-
99
-
100
-
101
-
102
-
103
-
104
-
105
-
106
-
107
-
108
-
109
-
110
-
111
-
112
-
113
-
114
-
115
-
116
-
117
-
118
-
119
-
120
-
121
-
122
-
123
-
124
-
125
-
126
-
127
-
128
-
129
-
130
-
131
-
132
-
133
-
134
-
135
-
136
-
137
-
138
-
139
-
140
-
141
-
142
-
143
-
144
-
145
-
146
-
147
-
148
-
149
-
150
-
151
-
152
-
153
-
154
-
155
-
156
-
157
-
158
-
159
-
160
-
161
-
162
-
163
-
164
-
165
-
166
-
167
-
168
-
169
-
170
-
171
-
172
-
173
-
174
-
175
-
176
-
177
-
178
-
179
-
180
-
181
-
182
-
183
-
184
-
185
-
186
-
187
-
188
-
189
-
190
-
191
-
192
-
193
-
194
-
195
-
196
-
197
-
198
-
199
-
200
-
201
-
202
-
203
-
204
-
205
-
206
-
207
-
208
-
209
-
210
-
211
-
212
-
213
-
214
-
215
-
216
-
217
-
218
-
219
-
220
-
221
-
222
-
223
-
224
-
225
-
226
-
227
-
228
-
229
-
230
-
231
-
232
-
233
-
234
-
235
-
236
-
237
-
238
-
239
-
240
-
241
-
242
-
243
-
244
-
245
-
246
-
247
-
248
-
249
-
250
-
251
-
252
-
 253
253 -
 254
254 -
 255
255 -
 256
256 -
 257
257 -
 258
258 -
 259
259 -
 260
260 -
 261
261 -
 262
262 -
 263
263
 |
 |
