JVC GY-DV300U 108 pg. instruction manual on the GY-DV300U Pro-DV Camcorder (PD - Page 13
Ch1/ch2 Audio Level] Ch-1/ch-2 Audio - gy dv300 manual
 |
View all JVC GY-DV300U manuals
Add to My Manuals
Save this manual to your list of manuals |
Page 13 highlights
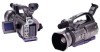
6 [FOCUS PUSH AUTO] Focus push auto button Pressing this button when the MANUAL mode is selected for the focus adjustment engages the forced auto focus mode as long as the button is pressed. When the button is released, the manual mode is restored. When the [FOCUS] switch 5 is set to "AUTO", this button does not work. 7 [CH1/CH2 AUDIO LEVEL] CH-1/CH-2 audio recording level controls Used to adjust the recording level of the CH-1 and CH-2 audio channels. To use these controls to adjust the audio level, set the CH1 AUDIO LEVEL or CH2 AUDIO LEVEL item to MANUAL on the OPERATION menu screen. Rotating clockwise increases the recording level. The recording level meter is displayed on the LCD screen and the viewfinder screen. B Tally lamp This lamp lights up red when the GY-DV300 is in the recording mode. It blinks slowly when the battery pack is exhausted and when there is about 3 minutes or less tape remaining. When the tape has run out, or the VTR enters the warning mode, it blinks quickly. Use the TALLY item on the SYSTEM [2/2] menu screen to select whether or not the lamp should light during recording. ( See page 92.) 8 LCD door This is the door behind which the LCD screen is located. The LCD screen can be viewed when the door is open. This door can be turned to face the LCD screen toward the lens (vertically inverted image) or downward. ( See page 39.) 9 LCD door lock release button Slide the button toward the rear side to open the LCD door. 0 Viewfinder Displays the camera image and the playback picture. The brightness and color saturation of the viewfinder screen can be adjusted on the DISPLAY [2/2] menu screen. The viewfinder can be turned approximately 75 degrees upward. A Viewfinder diopter adjustment knob Knob for adjusting until the viewfinder screen image is clearly visible. Raise the viewfinder to facilitate the adjustment. 13
-
 1
1 -
2
-
3
-
4
-
5
-
6
-
7
-
 8
8 -
 9
9 -
 10
10 -
 11
11 -
 12
12 -
 13
13 -
 14
14 -
 15
15 -
 16
16 -
 17
17 -
 18
18 -
19
-
20
-
21
-
22
-
23
-
24
-
25
-
26
-
27
-
28
-
29
-
30
-
31
-
32
-
33
-
34
-
35
-
36
-
37
-
38
-
39
-
40
-
41
-
42
-
43
-
44
-
45
-
46
-
47
-
48
-
49
-
50
-
51
-
52
-
53
-
54
-
55
-
56
-
57
-
58
-
59
-
60
-
61
-
62
-
63
-
64
-
65
-
66
-
67
-
68
-
69
-
70
-
71
-
72
-
73
-
74
-
75
-
76
-
77
-
78
-
79
-
80
-
81
-
82
-
83
-
84
-
85
-
86
-
87
-
88
-
89
-
90
-
91
-
92
-
93
-
94
-
95
-
96
-
97
-
98
-
99
-
100
-
101
-
102
-
103
-
104
-
105
-
106
-
107
-
108
 |
 |
