JVC GY-DV300U 108 pg. instruction manual on the GY-DV300U Pro-DV Camcorder (PD - Page 48
Shooting Mode Auto/Manual, Selection cont
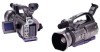 |
View all JVC GY-DV300U manuals
Add to My Manuals
Save this manual to your list of manuals |
Page 48 highlights
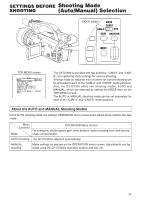
SETTINGS BEFORE SHOOTING Shooting Mode (Auto/Manual) Selection (cont'd) How to Select Either MANUAL or AUTO Shooting Mode MODE switch MODE MENU button CAM-B CAM-A VTR GAIN SHUTTER MENU SELECT dial TOP MENU screen MENU MO D E MANU AL E A R PHON E LEV EL 1 0 S YS T EM S E T . . D I S PLAY SE T . . CAME RA S E T [ C AM - A ] . . OPER AT I ON [ CAM- A ] . . C LOC K / TC . . MENU A L L R ESE T CANCE L EX I T Indication of set position of the MODE switch ● When the MODE item is set to MANUAL, the position of the MODE switch ("CAM-A" or "CAM-B") is indicated after the CAMERA SET and OPERATION SET items. The settings are valid for the position indicated for the MODE switch. ● When the MODE item is set to AUTO, the OPERATION SET items are not displayed. The position of the MODE switch ("CAM-A" or "CAM-B") is indicated after the CAMERA SET item. 1. Set the MODE switch to the "CAM-A" or "CAM-B" position. 2. Press the MENU button to display the TOP MENU screen. 3. Rotate the SELECT dial to align the cursor (f) with the MODE item, and then press the SELECT dial. ● The MODE item setting area is seen blinking, and settings can now be changed. 4. Rotate the SELECT dial to set to AUTO or MANUAL. AUTO : Auto shooting mode MANUAL : Manual shooting mode 5. Press the SELECT dial. ● The setting area stops blinking and the setting is confirmed and entered. 6. Rotate the SELECT dial to align the cursor (f) with the EXIT item, and then press the SELECT dial. ● The normal screen returns. 48
-
 1
1 -
2
-
3
-
4
-
5
-
6
-
7
-
8
-
9
-
10
-
11
-
12
-
13
-
14
-
15
-
16
-
17
-
18
-
19
-
20
-
21
-
22
-
23
-
24
-
25
-
26
-
27
-
28
-
29
-
30
-
31
-
32
-
33
-
34
-
35
-
36
-
37
-
38
-
39
-
40
-
41
-
42
-
 43
43 -
 44
44 -
 45
45 -
 46
46 -
 47
47 -
 48
48 -
 49
49 -
 50
50 -
 51
51 -
 52
52 -
 53
53 -
54
-
55
-
56
-
57
-
58
-
59
-
60
-
61
-
62
-
63
-
64
-
65
-
66
-
67
-
68
-
69
-
70
-
71
-
72
-
73
-
74
-
75
-
76
-
77
-
78
-
79
-
80
-
81
-
82
-
83
-
84
-
85
-
86
-
87
-
88
-
89
-
90
-
91
-
92
-
93
-
94
-
95
-
96
-
97
-
98
-
99
-
100
-
101
-
102
-
103
-
104
-
105
-
106
-
107
-
108
 |
 |
