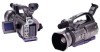
JVC GY-DV300U 108 pg. instruction manual on the GY-DV300U Pro-DV Camcorder (PD - Page 33
Power Supply Preparation
 |
View all JVC GY-DV300U manuals
Add to My Manuals
Save this manual to your list of manuals |
Page 33 highlights
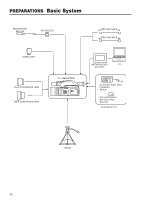
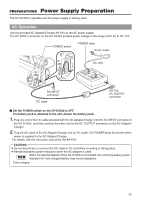
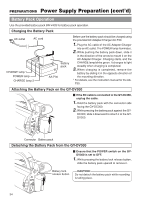
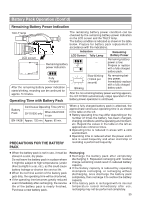
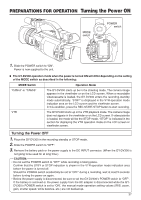
PREPARATIONS Power Supply Preparation The GY-DV300 is operable with AC power supply or battery pack. AC Operation Use the provided AC Adapter/Charger AA-P30 as the AC power supply. The DC INPUT connector on the GY-DV300 accepts power voltage in the range of DC 6V to DC 12V. POWER switch POWER lamp To AC outlet AC cord DC INPUT connector DC cable AA-P30 DC OUTPUT connector Set the POWER switch on the GY-DV300 to OFF. If a battery pack is attached to the unit, detach the battery pack. 1. Plug one end of the DC cable provided with the AC Adapter/Charger into the DC INPUT connector of the GY-DV300, and then connect the other end to the DC OUTPUT connector on the AC Adapter/ Charger. 2. Plug the AC cable of the AC Adapter/Charger into an AC outlet. The POWER lamp illuminates when power is supplied to the AC Adapter/Charger. * For details, see the instruction manual for the AA-P30. CAUTION: ● Do not disconnect or connect the DC cable or AC cord while recording is taking place. ● Remaining battery power indication when the AC adapter is used When the optional Network Pack KA-DV300 is connected, the remaining battery power indication for fully charged battery may not be displayed. Fully charged 33
-
 1
1 -
2
-
3
-
4
-
5
-
6
-
7
-
8
-
9
-
10
-
11
-
12
-
13
-
14
-
15
-
16
-
17
-
18
-
19
-
20
-
21
-
22
-
23
-
24
-
25
-
26
-
27
-
 28
28 -
 29
29 -
 30
30 -
 31
31 -
 32
32 -
 33
33 -
 34
34 -
 35
35 -
 36
36 -
 37
37 -
 38
38 -
39
-
40
-
41
-
42
-
43
-
44
-
45
-
46
-
47
-
48
-
49
-
50
-
51
-
52
-
53
-
54
-
55
-
56
-
57
-
58
-
59
-
60
-
61
-
62
-
63
-
64
-
65
-
66
-
67
-
68
-
69
-
70
-
71
-
72
-
73
-
74
-
75
-
76
-
77
-
78
-
79
-
80
-
81
-
82
-
83
-
84
-
85
-
86
-
87
-
88
-
89
-
90
-
91
-
92
-
93
-
94
-
95
-
96
-
97
-
98
-
99
-
100
-
101
-
102
-
103
-
104
-
105
-
106
-
107
-
108
 |
 |
