JVC GY-DV300U 108 pg. instruction manual on the GY-DV300U Pro-DV Camcorder (PD - Page 78
Disabling Operation of the Camera, Shake Compensation Function
 |
View all JVC GY-DV300U manuals
Add to My Manuals
Save this manual to your list of manuals |
Page 78 highlights
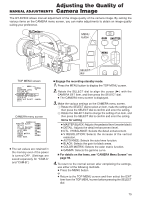
Disabling Operation of the CameraMANUAL ADJUSTMENTS Shake Compensation Function When shooting with the camera under conditions where the camera-shake compensation function is not required, e.g., with the camera mounted on a tripod base, etc., set the function to OFF before shooting. MENU button GAIN SHUTTER MENU SELECT dial TOP MENU screen MENU MO D E MANU AL E A R PHON E LEV EL 1 0 S YS T EM S E T . . D I S PLAY SE T . . CAME RA S E T [ C AM - A ] . . OPER AT I ON [ CAM- A ] . . C LOC K / TC . . MENU A L L R ESE T CANCE L EX I T MANUAL CAMERA menu screen OPERA T I ON [ A ] AE OFF IRI S AU TO SHU T T E R STEP WH I T E BA LA NC E AUTO OIS OFF CH1 AUD I O L EVE L AUTO CH2 AUD I O L EVE L AUTO PAGE BACK OFF Engage the recording-standby mode. 1. Press the MENU button to display the TOP MENU screen. 2. Using the SELECT dial, set the MODE item on the TOP MENU screen to MANUAL. ● The unit enters the manual shooting mode. 3. Rotate the SELECT dial to align the cursor (f) with the OPERATION SET item on the TOP MENU screen, and then press the SELECT dial. ● The OPERATION menu screen is displayed. 4. Using the SELECT dial, set the OIS item on the OPERATION menu screen to OFF, and then press the SELECT dial. ● The camera-shake compensation function is turned OFF. 5. To return to the normal screen, use either of the following methods. ● Press the MENU button or ● Return to the TOP MENU screen and then select the EXIT item from the TOP MENU screen before pressing the SELECT dial. Memo: When the camera-shake compensation function is turned OFF, the camera-shake compensation indicator is not shown on the LCD screen and the viewfinder screen. The camera-shake compensation indicator is extinguished. OIS: Optical Image Stabilizer 78 To turn the camera-shake compensation function ON again, use either of the following methods. ● Set the OIS item on the OPERATION menu screen to ON or ● Set the MODE item to AUTO on the TOP MENU screen. In this case the shooting mode becomes the auto mode.
-
 1
1 -
2
-
3
-
4
-
5
-
6
-
7
-
8
-
9
-
10
-
11
-
12
-
13
-
14
-
15
-
16
-
17
-
18
-
19
-
20
-
21
-
22
-
23
-
24
-
25
-
26
-
27
-
28
-
29
-
30
-
31
-
32
-
33
-
34
-
35
-
36
-
37
-
38
-
39
-
40
-
41
-
42
-
43
-
44
-
45
-
46
-
47
-
48
-
49
-
50
-
51
-
52
-
53
-
54
-
55
-
56
-
57
-
58
-
59
-
60
-
61
-
62
-
63
-
64
-
65
-
66
-
67
-
68
-
69
-
70
-
71
-
72
-
 73
73 -
 74
74 -
 75
75 -
 76
76 -
 77
77 -
 78
78 -
 79
79 -
 80
80 -
 81
81 -
 82
82 -
 83
83 -
84
-
85
-
86
-
87
-
88
-
89
-
90
-
91
-
92
-
93
-
94
-
95
-
96
-
97
-
98
-
99
-
100
-
101
-
102
-
103
-
104
-
105
-
106
-
107
-
108
 |
 |
