JVC GY-DV300U 108 pg. instruction manual on the GY-DV300U Pro-DV Camcorder (PD - Page 77
Adjusting the Audio Recording Level Manually, Reducing the Wind Noise of the Microphone
 |
View all JVC GY-DV300U manuals
Add to My Manuals
Save this manual to your list of manuals |
Page 77 highlights
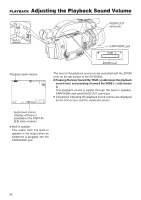
2. Adjusting the Audio Recording Level Manually CH-1 CH-2 AUDIO LEVEL AUDIO LEVEL controls ● The standard level for recording audio on the tape is -12 dB. If a tape recorded on the GYDV300 is played back on VCR whose audio standard level is - 20dB, the sound will be very loud. If a tape recorded on other VCR whose audio standard level is -20dB is played back on GYDV300, the sound will be very low. 1. Turn the AUDIO LEVEL controls. The audio recording level of CH-1 channel is adjusted with the CH-1 AUDIO LEVEL control, and the CH-2 channel is adjusted with the CH-2 AUDIO LEVEL control. The recording level is raised when the control is turned clockwise. ● Adjust the level while observing the audio level meter on the LCD screen or the viewfinder screen and/or monitoring the sound. The monitor sound is output from the EARPHONE jack ( See page 51) To return to the automatic audio recording level adjustment mode, use either of the following methods. ● Set the CH1 AUDIO LEVEL or CH2 AUDIO LEVEL item on the OPERATION menu screen to AUTO or ● Set the MODE item to AUTO on the TOP MENU screen. In this case the shooting mode becomes the auto mode. The audio level meter is displayed by setting the AUDIO LEVEL item on the DISPLAY [2/2] menu screen to ON. Reducing the Wind Noise of the Microphone SYSTEM [1/2] menu screen SY STEM [ 1 / 2 ] M I C1 I NPUT SE L I NT WI N D CUT M I C1 ON W I N D C UT M I C 2 ON +48V M IC1 OF F +48V M IC2 OF F AUD I O MOD E 4 8K REC MODE SP LONG PAUSE T I ME 3 0M I N N E X T P AG E PAGE BACK Set the WIND CUT MIC1 or WIND CUT MIC2 item on the SYSTEM [1/2] menu screen to ON. WIND CUT MIC1 WIND CUT MIC2 Set to ON to reduce the wind noise of the built-in microphone or a microphone connected to the MIC 1 input connector. Set to ON to reduce the wind noise of a microphone connected to the MIC 2 input connector. 77
-
 1
1 -
2
-
3
-
4
-
5
-
6
-
7
-
8
-
9
-
10
-
11
-
12
-
13
-
14
-
15
-
16
-
17
-
18
-
19
-
20
-
21
-
22
-
23
-
24
-
25
-
26
-
27
-
28
-
29
-
30
-
31
-
32
-
33
-
34
-
35
-
36
-
37
-
38
-
39
-
40
-
41
-
42
-
43
-
44
-
45
-
46
-
47
-
48
-
49
-
50
-
51
-
52
-
53
-
54
-
55
-
56
-
57
-
58
-
59
-
60
-
61
-
62
-
63
-
64
-
65
-
66
-
67
-
68
-
69
-
70
-
71
-
 72
72 -
 73
73 -
 74
74 -
 75
75 -
 76
76 -
 77
77 -
 78
78 -
 79
79 -
 80
80 -
 81
81 -
 82
82 -
83
-
84
-
85
-
86
-
87
-
88
-
89
-
90
-
91
-
92
-
93
-
94
-
95
-
96
-
97
-
98
-
99
-
100
-
101
-
102
-
103
-
104
-
105
-
106
-
107
-
108
 |
 |
