JVC GY-DV300U 108 pg. instruction manual on the GY-DV300U Pro-DV Camcorder (PD - Page 36
Attaching the Microphone optional
 |
View all JVC GY-DV300U manuals
Add to My Manuals
Save this manual to your list of manuals |
Page 36 highlights
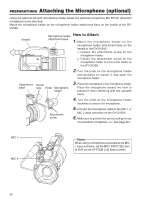
PREPARATIONS Attaching the Microphone (optional) Using the optional KA-A33 microphone holder allows the optional microphone MV-P615U (phantom microphone) to be attached. Mount the microphone holder on the microphone holder attachment base on the handle of the GYDV300. Handle Attachment base Microphone holder How to Attach 1. attachment base Mount the microphone holder on the microphone holder attachment base on the handle of the GY-DV300. MIC 1 IN 1 Loosen the attachment screw on the microphone holder. 2 Fasten the attachment screw on the MIC 2 IN microphone holder to secure the holder to the GY-DV300. EARPHONE DV Y/C OUT LINE CH-2 OUT CH-1 VIDEO OUT 2. Turn the knob on the microphone holder anticlockwise to loosen it and open the microphone holder. Screw hole Knob Microphone holder 3. Place the microphone in the microphone holder. Place the microphone toward the front to prevent it from interfering with the cassette cover. 4. Turn the knob on the microphone holder clockwise to secure the microphone. Attachment screw 5. Connect the microphone cable to the MIC 1 or MIC 2 input connector on the GY-DV300. 6. Make sure to perform the correct setting for use of a phantom microphone. ( See page 50.) MIC 1 MIC 2 Memo: When using a microphone connected to the MIC 1 input connector, set the MIC1 INPUT SEL item to XLR on the SYSTEM [1/2] menu screen. 36
-
 1
1 -
2
-
3
-
4
-
5
-
6
-
7
-
8
-
9
-
10
-
11
-
12
-
13
-
14
-
15
-
16
-
17
-
18
-
19
-
20
-
21
-
22
-
23
-
24
-
25
-
26
-
27
-
28
-
29
-
30
-
 31
31 -
 32
32 -
 33
33 -
 34
34 -
 35
35 -
 36
36 -
 37
37 -
 38
38 -
 39
39 -
 40
40 -
 41
41 -
42
-
43
-
44
-
45
-
46
-
47
-
48
-
49
-
50
-
51
-
52
-
53
-
54
-
55
-
56
-
57
-
58
-
59
-
60
-
61
-
62
-
63
-
64
-
65
-
66
-
67
-
68
-
69
-
70
-
71
-
72
-
73
-
74
-
75
-
76
-
77
-
78
-
79
-
80
-
81
-
82
-
83
-
84
-
85
-
86
-
87
-
88
-
89
-
90
-
91
-
92
-
93
-
94
-
95
-
96
-
97
-
98
-
99
-
100
-
101
-
102
-
103
-
104
-
105
-
106
-
107
-
108
 |
 |
