Kodak ESP9 User Manual - Page 34
Configuring network settings, Configuring an Ethernet network connection, Ethernet setup - manual
 |
UPC - 041771349479
View all Kodak ESP9 manuals
Add to My Manuals
Save this manual to your list of manuals |
Page 34 highlights
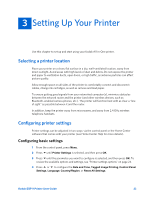
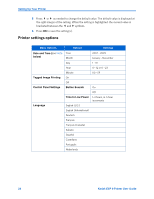
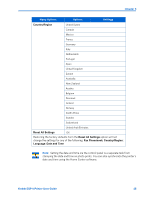
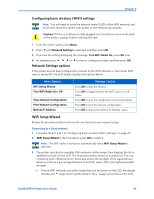
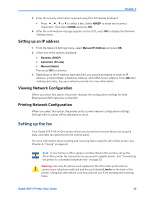
Setting Up Your Printer Configuring network settings You can connect your ESP All-in-One printer to a wired (Ethernet) network or to a wireless (WiFi) network. You may refer to the "Start Here" booklet that came with your printer, or review the following sections as needed. Configuring an Ethernet network connection You will need the following items to connect the All-in-One printer printer to a wired (Ethernet) network: • A functional Ethernet network that includes a router, switch, or hub with an Ethernet port. • A CAT-5 (or higher) Ethernet cable Ethernet setup 1 Plug one end of the Ethernet cable into the Ethernet port located on the back of the All- in-One printer and the other end into an available port on your Ethernet router or hub. 2 Turn on the printer, if necessary. 3 From the control panel, press Menu. 4 Press until Network Settings is selected, and then press OK. 5 If you see the setting: Turn WiFi Radio Off, press OK now. This disconnects any existing wireless (WiFi) network connections. 6 Use the Manual IP Address to change the IP Address. See your network provider for assistance. Configuring a wireless network connection You can connect your printer to a 802.11 wireless (WiFi) network from the All-in-One printer control panel. 26 Kodak ESP 9 Printer User Guide
-
 1
1 -
2
-
3
-
4
-
5
-
6
-
7
-
8
-
9
-
10
-
11
-
12
-
13
-
14
-
15
-
16
-
17
-
18
-
19
-
20
-
21
-
22
-
23
-
24
-
25
-
26
-
27
-
28
-
 29
29 -
 30
30 -
 31
31 -
 32
32 -
 33
33 -
 34
34 -
 35
35 -
 36
36 -
 37
37 -
 38
38 -
 39
39 -
40
-
41
-
42
-
43
-
44
-
45
-
46
-
47
-
48
-
49
-
50
-
51
-
52
-
53
-
54
-
55
-
56
-
57
-
58
-
59
-
60
-
61
-
62
-
63
-
64
-
65
-
66
-
67
-
68
-
69
-
70
-
71
-
72
-
73
-
74
-
75
-
76
-
77
-
78
-
79
-
80
-
81
-
82
-
83
-
84
-
85
-
86
-
87
-
88
-
89
-
90
-
91
-
92
-
93
-
94
-
95
-
96
-
97
-
98
-
99
-
100
-
101
-
102
-
103
-
104
-
105
-
106
-
107
-
108
-
109
-
110
-
111
-
112
-
113
-
114
-
115
-
116
-
117
-
118
-
119
-
120
-
121
-
122
-
123
-
124
-
125
-
126
-
127
-
128
-
129
-
130
-
131
-
132
-
133
-
134
-
135
-
136
-
137
-
138
-
139
-
140
-
141
 |
 |
