Kodak ESP9 User Manual - Page 36
Connecting to an unlisted network - setup
 |
UPC - 041771349479
View all Kodak ESP9 manuals
Add to My Manuals
Save this manual to your list of manuals |
Page 36 highlights
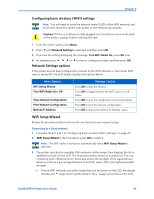
Setting Up Your Printer As appropriate, press or on the control panel until you locate the network you want to use. The last two options displayed are Unlisted network and Rescan for wireless networks. Note: In your setup, instead of as shown in the illustration above, the LCD will show the actual network name (SSID), without the brackets, and the signal strength, displayed as a percentage, of each available WiFi network within range. 4 With the desired network selected, press OK. You may need network identification information such as a security string, in order to authenticate your connection. • If you are looking for a WiFi network that does not broadcast its SSID, see "Connecting to an unlisted network" below. Note: If your printer was last connected to an available network on the list, the network settings are saved and the printer will automatically attempt to reconnect you to that network. 5 If the network requires the entry of a security string, the keyboard will be shown on the LCD. Press , , or to select a key. Enter the security string using the correct upper and lower case characters and numbers as required. Note: To erase any letters or numbers entered in error, select
-
 1
1 -
2
-
3
-
4
-
5
-
6
-
7
-
8
-
9
-
10
-
11
-
12
-
13
-
14
-
15
-
16
-
17
-
18
-
19
-
20
-
21
-
22
-
23
-
24
-
25
-
26
-
27
-
28
-
29
-
30
-
 31
31 -
 32
32 -
 33
33 -
 34
34 -
 35
35 -
 36
36 -
 37
37 -
 38
38 -
 39
39 -
 40
40 -
 41
41 -
42
-
43
-
44
-
45
-
46
-
47
-
48
-
49
-
50
-
51
-
52
-
53
-
54
-
55
-
56
-
57
-
58
-
59
-
60
-
61
-
62
-
63
-
64
-
65
-
66
-
67
-
68
-
69
-
70
-
71
-
72
-
73
-
74
-
75
-
76
-
77
-
78
-
79
-
80
-
81
-
82
-
83
-
84
-
85
-
86
-
87
-
88
-
89
-
90
-
91
-
92
-
93
-
94
-
95
-
96
-
97
-
98
-
99
-
100
-
101
-
102
-
103
-
104
-
105
-
106
-
107
-
108
-
109
-
110
-
111
-
112
-
113
-
114
-
115
-
116
-
117
-
118
-
119
-
120
-
121
-
122
-
123
-
124
-
125
-
126
-
127
-
128
-
129
-
130
-
131
-
132
-
133
-
134
-
135
-
136
-
137
-
138
-
139
-
140
-
141
 |
 |
