Kodak ESP9 User Manual - Page 73
Using Quick Dial to select a Fax Phonebook entry, Specifying a Quick Dial recipient from the keypad
 |
UPC - 041771349479
View all Kodak ESP9 manuals
Add to My Manuals
Save this manual to your list of manuals |
Page 73 highlights
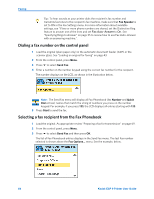
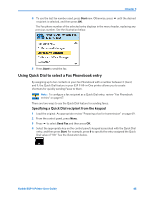
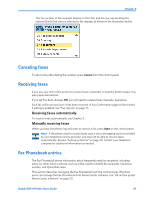
Chapter 8 4 To use the last fax number used, press Start now. Otherwise, press until the desired recipient is selected, and then press OK. The Fax phone number of the selected entry displays in the menu header, replacing any previous number. See the illustration below. 5 Press Start to send the fax. Using Quick Dial to select a Fax Phonebook entry By assigning up to ten contacts in your Fax Phonebook with a number between 0 (zero) and 9, the Quick Dial feature in your ESP 9 All-in-One printer allows you to create shortcuts for quickly sending Faxes to them. Note: To configure a fax recipient as a Quick Dial entry, review "Fax Phonebook entries" on page 67. There are two ways to use the Quick Dial feature for sending faxes. Specifying a Quick Dial recipient from the keypad 1 Load the original. As appropriate review "Preparing a fax for transmission" on page 69. 2 From the control panel, press Menu. 3 Press to select Send Fax and then press OK. 4 Select the appropriate key on the control panel's keypad associated with the Quick Dial entry, and then press Start. For example, press 8 to specify the entry assigned the Quick Dial value of "08." See the illustration below. Kodak ESP 9 Printer User Guide 65
-
 1
1 -
2
-
3
-
4
-
5
-
6
-
7
-
8
-
9
-
10
-
11
-
12
-
13
-
14
-
15
-
16
-
17
-
18
-
19
-
20
-
21
-
22
-
23
-
24
-
25
-
26
-
27
-
28
-
29
-
30
-
31
-
32
-
33
-
34
-
35
-
36
-
37
-
38
-
39
-
40
-
41
-
42
-
43
-
44
-
45
-
46
-
47
-
48
-
49
-
50
-
51
-
52
-
53
-
54
-
55
-
56
-
57
-
58
-
59
-
60
-
61
-
62
-
63
-
64
-
65
-
66
-
67
-
 68
68 -
 69
69 -
 70
70 -
 71
71 -
 72
72 -
 73
73 -
 74
74 -
 75
75 -
 76
76 -
 77
77 -
 78
78 -
79
-
80
-
81
-
82
-
83
-
84
-
85
-
86
-
87
-
88
-
89
-
90
-
91
-
92
-
93
-
94
-
95
-
96
-
97
-
98
-
99
-
100
-
101
-
102
-
103
-
104
-
105
-
106
-
107
-
108
-
109
-
110
-
111
-
112
-
113
-
114
-
115
-
116
-
117
-
118
-
119
-
120
-
121
-
122
-
123
-
124
-
125
-
126
-
127
-
128
-
129
-
130
-
131
-
132
-
133
-
134
-
135
-
136
-
137
-
138
-
139
-
140
-
141
 |
 |
