Konica Minolta Fujitsu fi-6800 Operating Guide - Page 123
Cleaning the ADF (with cloth), Pick Roller 2 units, Separator Roller 1 unit
 |
View all Konica Minolta Fujitsu fi-6800 manuals
Add to My Manuals
Save this manual to your list of manuals |
Page 123 highlights
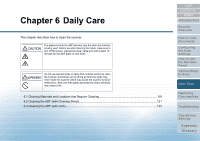
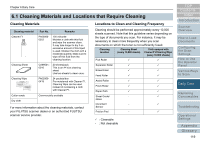
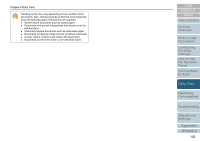
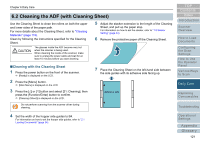
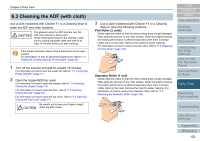
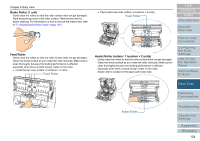
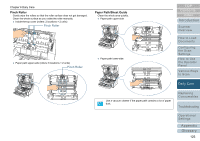
Chapter 6 Daily Care 6.3 Cleaning the ADF (with cloth) Use a cloth moistened with Cleaner F1 or a Cleaning Wipe to clean the ADF and other locations. The glasses inside the ADF become very hot when the scanner is being used. When cleaning the inside of the scanner, make sure to unplug the power cable and wait for at least 15 minutes before you start cleaning. If the hopper has been raised, bring it back down to the lower position. For information on how to adjust the hopper level, refer to "1.7 Setting the Loading Capacity of the Hopper" (page 23). 1 Turn off the scanner and wait for at least 15 minutes. For information on how to turn the power off, refer to "1.3 Turning the Power ON/OFF" (page 17). 2 Open the hopper/ADF/top cover. For information on how to open the hopper, refer to "1.4 Opening/ Closing the Hopper" (page 19). For information on how to open the ADF, refer to "1.5 Opening/ Closing the ADF" (page 20). For information on how to open the top cover, refer to "1.6 Opening/ Closing the Top Cover" (page 22). Be careful not to have your fingers caught when the ADF closes. 3 Use a cloth moistened with Cleaner F1 or a Cleaning Wipe to clean the following locations. Pick Roller (2 units) Gently wipe the rollers so that the roller surface does not get damaged. Wipe along the grooves of the roller surface. Clean thoroughly because the feeding performance is affected especially when there is foreign matter stuck on the roller. Remove the rollers for easier cleaning. For information on how to remove the pick roller, refer to "7.2 Replacing the Pick Roller" (page 132). Separator Roller (1 unit) Gently wipe the rollers so that the roller surface does not get damaged. Wipe along the grooves of the roller surface. Clean thoroughly because the feeding performance is affected especially when there is foreign matter stuck on the roller. Remove the roller for easier cleaning. For information on how to remove the separator roller, refer to "7.3 Replacing the Separator Roller" (page 134). TOP Contents Index Introduction Scanner Overview How to Load Documents Configuring the Scan Settings How to Use the Operator Panel Various Ways to Scan Daily Care Replacing Consumables Troubleshooting Operational Settings Appendix Glossary 123
-
 1
1 -
2
-
3
-
4
-
5
-
6
-
7
-
8
-
9
-
10
-
11
-
12
-
13
-
14
-
15
-
16
-
17
-
18
-
19
-
20
-
21
-
22
-
23
-
24
-
25
-
26
-
27
-
28
-
29
-
30
-
31
-
32
-
33
-
34
-
35
-
36
-
37
-
38
-
39
-
40
-
41
-
42
-
43
-
44
-
45
-
46
-
47
-
48
-
49
-
50
-
51
-
52
-
53
-
54
-
55
-
56
-
57
-
58
-
59
-
60
-
61
-
62
-
63
-
64
-
65
-
66
-
67
-
68
-
69
-
70
-
71
-
72
-
73
-
74
-
75
-
76
-
77
-
78
-
79
-
80
-
81
-
82
-
83
-
84
-
85
-
86
-
87
-
88
-
89
-
90
-
91
-
92
-
93
-
94
-
95
-
96
-
97
-
98
-
99
-
100
-
101
-
102
-
103
-
104
-
105
-
106
-
107
-
108
-
109
-
110
-
111
-
112
-
113
-
114
-
115
-
116
-
117
-
 118
118 -
 119
119 -
 120
120 -
 121
121 -
 122
122 -
 123
123 -
 124
124 -
 125
125 -
 126
126 -
 127
127 -
 128
128 -
129
-
130
-
131
-
132
-
133
-
134
-
135
-
136
-
137
-
138
-
139
-
140
-
141
-
142
-
143
-
144
-
145
-
146
-
147
-
148
-
149
-
150
-
151
-
152
-
153
-
154
-
155
-
156
-
157
-
158
-
159
-
160
-
161
-
162
-
163
-
164
-
165
-
166
-
167
-
168
-
169
-
170
-
171
-
172
-
173
-
174
-
175
-
176
-
177
-
178
-
179
-
180
-
181
-
182
-
183
-
184
-
185
-
186
-
187
-
188
-
189
-
190
-
191
-
192
-
193
-
194
-
195
-
196
-
197
-
198
-
199
-
200
-
201
-
202
-
203
-
204
-
205
-
206
-
207
-
208
-
209
-
210
-
211
-
212
-
213
-
214
-
215
-
216
-
217
-
218
-
219
-
220
-
221
-
222
-
223
-
224
-
225
-
226
-
227
-
228
-
229
-
230
-
231
-
232
-
233
-
234
-
235
-
236
-
237
-
238
-
239
-
240
-
241
-
242
-
243
 |
 |