Konica Minolta Fujitsu fi-6800 Operating Guide - Page 92
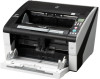
Click the [Rotation] tab and select [Automatic Size
 |
View all Konica Minolta Fujitsu fi-6800 manuals
Add to My Manuals
Save this manual to your list of manuals |
Page 92 highlights
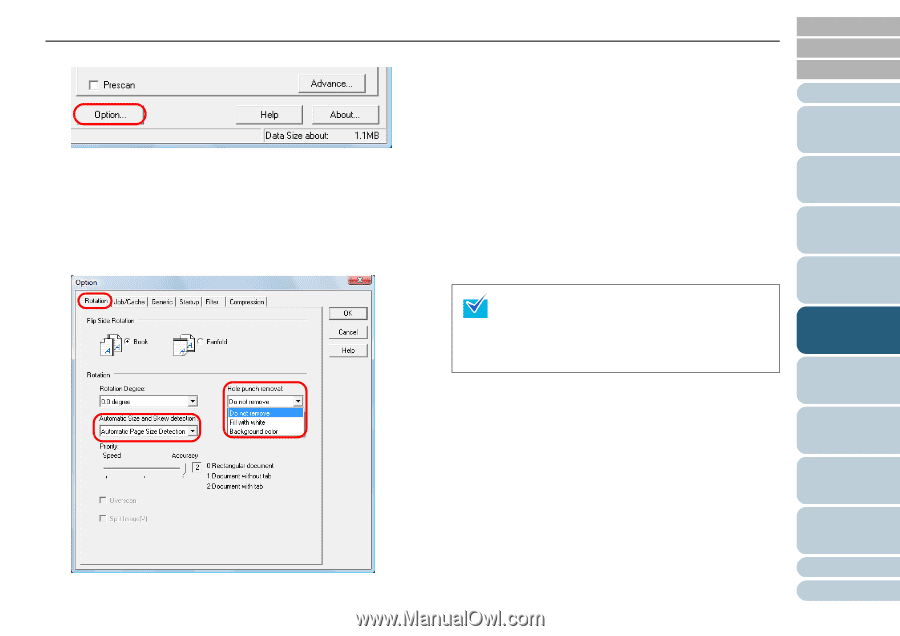
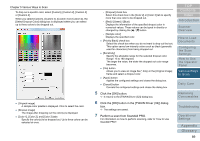
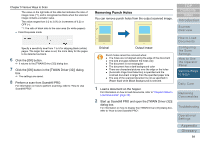
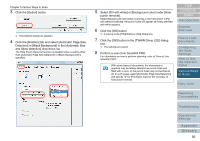
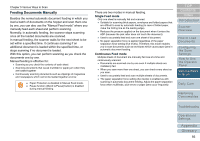
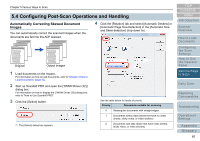
Chapter 5 Various Ways to Scan 3 Click the [Option] button. D The [Option] dialog box appears. 4 Click the [Rotation] tab and select [Automatic Page Size Detection] or [Black Background] in the [Automatic Size and Skew detection] drop-down list. The Hole Punch Removal function is disabled when a setting other than [Automatic Page Size Detection] or [Black Background] is specified. 5 Select [Fill with white] or [Background color] under [Hole punch removal]. Select [Background color] when scanning a color document. If [Fill with white] is selected, the punch holes will appear as if they are filled with white squares. 6 Click the [OK] button. D It returns to the [TWAIN Driver (32)] dialog box. 7 Click the [OK] button in the [TWAIN Driver (32)] dialog box. D The settings are saved. 8 Perform a scan from ScandAll PRO. For information on how to perform scanning, refer to "How to Use ScandAll PRO". With some types of documents, the characters or graphics may be falsely detected as punch holes and filled with a color, or the punch holes may not be filled at all. In such cases, select [Automatic Page Size Detection] and specify "2" for [Priority] to improve the accuracy of hole punch removal. TOP Contents Index Introduction Scanner Overview How to Load Documents Configuring the Scan Settings How to Use the Operator Panel Various Ways to Scan Daily Care Replacing Consumables Troubleshooting Operational Settings Appendix Glossary 92
-
 1
1 -
2
-
3
-
4
-
5
-
6
-
7
-
8
-
9
-
10
-
11
-
12
-
13
-
14
-
15
-
16
-
17
-
18
-
19
-
20
-
21
-
22
-
23
-
24
-
25
-
26
-
27
-
28
-
29
-
30
-
31
-
32
-
33
-
34
-
35
-
36
-
37
-
38
-
39
-
40
-
41
-
42
-
43
-
44
-
45
-
46
-
47
-
48
-
49
-
50
-
51
-
52
-
53
-
54
-
55
-
56
-
57
-
58
-
59
-
60
-
61
-
62
-
63
-
64
-
65
-
66
-
67
-
68
-
69
-
70
-
71
-
72
-
73
-
74
-
75
-
76
-
77
-
78
-
79
-
80
-
81
-
82
-
83
-
84
-
85
-
86
-
 87
87 -
 88
88 -
 89
89 -
 90
90 -
 91
91 -
 92
92 -
 93
93 -
 94
94 -
 95
95 -
 96
96 -
 97
97 -
98
-
99
-
100
-
101
-
102
-
103
-
104
-
105
-
106
-
107
-
108
-
109
-
110
-
111
-
112
-
113
-
114
-
115
-
116
-
117
-
118
-
119
-
120
-
121
-
122
-
123
-
124
-
125
-
126
-
127
-
128
-
129
-
130
-
131
-
132
-
133
-
134
-
135
-
136
-
137
-
138
-
139
-
140
-
141
-
142
-
143
-
144
-
145
-
146
-
147
-
148
-
149
-
150
-
151
-
152
-
153
-
154
-
155
-
156
-
157
-
158
-
159
-
160
-
161
-
162
-
163
-
164
-
165
-
166
-
167
-
168
-
169
-
170
-
171
-
172
-
173
-
174
-
175
-
176
-
177
-
178
-
179
-
180
-
181
-
182
-
183
-
184
-
185
-
186
-
187
-
188
-
189
-
190
-
191
-
192
-
193
-
194
-
195
-
196
-
197
-
198
-
199
-
200
-
201
-
202
-
203
-
204
-
205
-
206
-
207
-
208
-
209
-
210
-
211
-
212
-
213
-
214
-
215
-
216
-
217
-
218
-
219
-
220
-
221
-
222
-
223
-
224
-
225
-
226
-
227
-
228
-
229
-
230
-
231
-
232
-
233
-
234
-
235
-
236
-
237
-
238
-
239
-
240
-
241
-
242
-
243
 |
 |