Konica Minolta Fujitsu fi-6800 Operating Guide - Page 203
Scan Settings for Documents with Tabs/Non- rectangular Documents [Scan Setting for Document with Tab (Automatic Size Detection)]
 |
View all Konica Minolta Fujitsu fi-6800 manuals
Add to My Manuals
Save this manual to your list of manuals |
Page 203 highlights
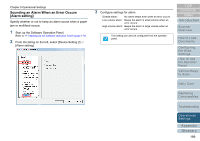
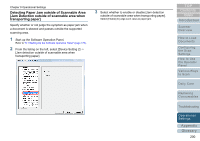
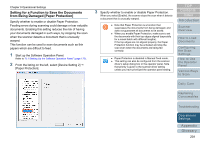
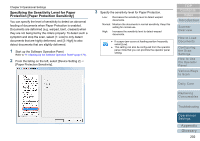
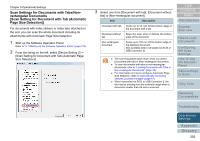
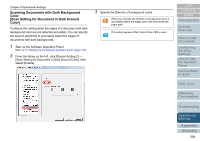
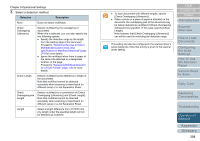
Chapter 9 Operational Settings Scan Settings for Documents with Tabs/Nonrectangular Documents [Scan Setting for Document with Tab (Automatic Page Size Detection)] For documents with index stickers or index tabs attached on the end, you can scan the whole document including its attachments with Automatic Page Size Detection. 1 Start up the Software Operation Panel. Refer to "9.1 Starting Up the Software Operation Panel" (page 170). 2 From the listing on the left, select [Device Setting 2] J [Scan Setting for Document with Tab (Automatic Page Size Detection)]. 3 Select one from [Document with tab], [Document without tab] or [Non-rectangular document]. Item Description Document with tab Scans up to 20 mm off the bottom edge of the document with a tab. Document without tab Stops the scan when it detects the bottom edge of the document. Non-rectangular document Scans up to 120 mm off the bottom edge of the detected document. (Not available when connected via SCSI or USB Connector 2) z The scanning speed slows down when you select [Document with tab] or [Non-rectangular document]. z To scan documents with tabs or non-rectangular documents, refer to "Loading Documents with Tabs or Non-rectangular Documents" (page 43). z For information on how to configure Automatic Page Size Detection, refer to "Automatically Correcting Skewed Document Images" (page 97). z When connected via SCSI or USB Connector 2, the tab may be missing from the scanned image when a document smaller than A5 size is scanned. TOP Contents Index Introduction Scanner Overview How to Load Documents Configuring the Scan Settings How to Use the Operator Panel Various Ways to Scan Daily Care Replacing Consumables Troubleshooting Operational Settings Appendix Glossary 203
-
 1
1 -
2
-
3
-
4
-
5
-
6
-
7
-
8
-
9
-
10
-
11
-
12
-
13
-
14
-
15
-
16
-
17
-
18
-
19
-
20
-
21
-
22
-
23
-
24
-
25
-
26
-
27
-
28
-
29
-
30
-
31
-
32
-
33
-
34
-
35
-
36
-
37
-
38
-
39
-
40
-
41
-
42
-
43
-
44
-
45
-
46
-
47
-
48
-
49
-
50
-
51
-
52
-
53
-
54
-
55
-
56
-
57
-
58
-
59
-
60
-
61
-
62
-
63
-
64
-
65
-
66
-
67
-
68
-
69
-
70
-
71
-
72
-
73
-
74
-
75
-
76
-
77
-
78
-
79
-
80
-
81
-
82
-
83
-
84
-
85
-
86
-
87
-
88
-
89
-
90
-
91
-
92
-
93
-
94
-
95
-
96
-
97
-
98
-
99
-
100
-
101
-
102
-
103
-
104
-
105
-
106
-
107
-
108
-
109
-
110
-
111
-
112
-
113
-
114
-
115
-
116
-
117
-
118
-
119
-
120
-
121
-
122
-
123
-
124
-
125
-
126
-
127
-
128
-
129
-
130
-
131
-
132
-
133
-
134
-
135
-
136
-
137
-
138
-
139
-
140
-
141
-
142
-
143
-
144
-
145
-
146
-
147
-
148
-
149
-
150
-
151
-
152
-
153
-
154
-
155
-
156
-
157
-
158
-
159
-
160
-
161
-
162
-
163
-
164
-
165
-
166
-
167
-
168
-
169
-
170
-
171
-
172
-
173
-
174
-
175
-
176
-
177
-
178
-
179
-
180
-
181
-
182
-
183
-
184
-
185
-
186
-
187
-
188
-
189
-
190
-
191
-
192
-
193
-
194
-
195
-
196
-
197
-
 198
198 -
 199
199 -
 200
200 -
 201
201 -
 202
202 -
 203
203 -
 204
204 -
 205
205 -
 206
206 -
 207
207 -
 208
208 -
209
-
210
-
211
-
212
-
213
-
214
-
215
-
216
-
217
-
218
-
219
-
220
-
221
-
222
-
223
-
224
-
225
-
226
-
227
-
228
-
229
-
230
-
231
-
232
-
233
-
234
-
235
-
236
-
237
-
238
-
239
-
240
-
241
-
242
-
243
 |
 |