Konica Minolta Fujitsu fi-6800 Operating Guide - Page 77
the Scan
 |
View all Konica Minolta Fujitsu fi-6800 manuals
Add to My Manuals
Save this manual to your list of manuals |
Page 77 highlights
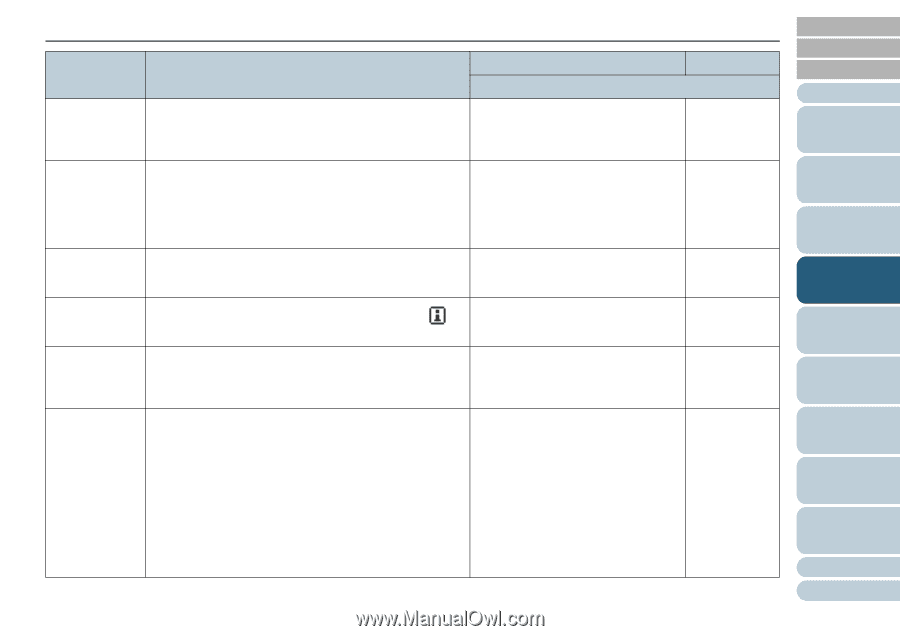
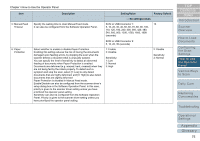
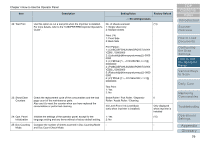
Chapter 4 How to Use the Operator Panel Item Description Setting/Value Factory Default - : No settings/values 13: Button Sound Specify whether or not to make a sound when a button on the Vol operator panel is pressed. 1: OFF 2: Low 3: High (ring time fixed at 0.01 second) 1: OFF 14: Contrast Specify the contrast for the LCD on the operator panel. Weak Strong „„„…… 15: Backlight ON Specify the duration for which the backlight is lit ON. OFF, ON, 5, 10, 20, 30, 40, 50, 60, 90, ON Until initialization is complete after turning the power on, this item 120, 150, 180, 210, 240, 270, 300 operates in [ON] regardless of the setting configured. (seconds) 16: LED Blink 0.5, 1.0, 1.5, 2.0, 2.5 (seconds) 2.0 Cycle Specify the interval in which the Check LED flashes when (for Information) is displayed on the LCD. 17: Horizontal Scroll Speed Specify the speed in which the display is horizontally scrolled. The displayed item is scrolled horizontally when the text does not fit in the LCD. 1: Fast 2: Normal 3: Slow 4: OFF 2: Normal 18: Operation Specify the time to return to the [Ready] screen from [Hopper OFF, 5 to 9 (seconds) 7 Panel Timeout Level] or [Paper Separation Force]. Note that this option is only available when you display [Hopper Level] or [Paper Separation Force] from the [Ready] screen by using a shortcut key. To display [Hopper Level] by shortcut key, press the [Eject] button and either the [U] or [V] button at the same time when [Ready] is displayed. Note that the [Hopper Level] screen is not displayed unless the two buttons are pressed simultaneously. To display the [Paper Separation Force] screen by shortcut key, press the [U] or [V] button in the [Ready] screen. TOP Contents Index Introduction Scanner Overview How to Load Documents Configuring the Scan Settings How to Use the Operator Panel Various Ways to Scan Daily Care Replacing Consumables Troubleshooting Operational Settings Appendix Glossary 77
-
 1
1 -
2
-
3
-
4
-
5
-
6
-
7
-
8
-
9
-
10
-
11
-
12
-
13
-
14
-
15
-
16
-
17
-
18
-
19
-
20
-
21
-
22
-
23
-
24
-
25
-
26
-
27
-
28
-
29
-
30
-
31
-
32
-
33
-
34
-
35
-
36
-
37
-
38
-
39
-
40
-
41
-
42
-
43
-
44
-
45
-
46
-
47
-
48
-
49
-
50
-
51
-
52
-
53
-
54
-
55
-
56
-
57
-
58
-
59
-
60
-
61
-
62
-
63
-
64
-
65
-
66
-
67
-
68
-
69
-
70
-
71
-
 72
72 -
 73
73 -
 74
74 -
 75
75 -
 76
76 -
 77
77 -
 78
78 -
 79
79 -
 80
80 -
 81
81 -
 82
82 -
83
-
84
-
85
-
86
-
87
-
88
-
89
-
90
-
91
-
92
-
93
-
94
-
95
-
96
-
97
-
98
-
99
-
100
-
101
-
102
-
103
-
104
-
105
-
106
-
107
-
108
-
109
-
110
-
111
-
112
-
113
-
114
-
115
-
116
-
117
-
118
-
119
-
120
-
121
-
122
-
123
-
124
-
125
-
126
-
127
-
128
-
129
-
130
-
131
-
132
-
133
-
134
-
135
-
136
-
137
-
138
-
139
-
140
-
141
-
142
-
143
-
144
-
145
-
146
-
147
-
148
-
149
-
150
-
151
-
152
-
153
-
154
-
155
-
156
-
157
-
158
-
159
-
160
-
161
-
162
-
163
-
164
-
165
-
166
-
167
-
168
-
169
-
170
-
171
-
172
-
173
-
174
-
175
-
176
-
177
-
178
-
179
-
180
-
181
-
182
-
183
-
184
-
185
-
186
-
187
-
188
-
189
-
190
-
191
-
192
-
193
-
194
-
195
-
196
-
197
-
198
-
199
-
200
-
201
-
202
-
203
-
204
-
205
-
206
-
207
-
208
-
209
-
210
-
211
-
212
-
213
-
214
-
215
-
216
-
217
-
218
-
219
-
220
-
221
-
222
-
223
-
224
-
225
-
226
-
227
-
228
-
229
-
230
-
231
-
232
-
233
-
234
-
235
-
236
-
237
-
238
-
239
-
240
-
241
-
242
-
243
 |
 |