Kyocera 1010N Operation Guide - Page 110
then install again., counter. Next time you turn on the power to the printer, keep pushing
 |
UPC - 632983001004
View all Kyocera 1010N manuals
Add to My Manuals
Save this manual to your list of manuals |
Page 110 highlights
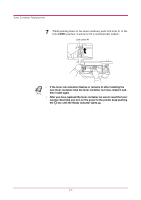
Toner Container Replacement 7 While pushing down on the toner container, push lock lever #1 to the lock (LOCK) position. (Lock lever #2 is automatically locked.) Lock Lever #1 LOCK UNLOCK LOCK UNLOCK • If the toner low indication flashes or remains lit after installing the new toner container, take the toner container out once, shake it well, Note then install again. • After you have replaced the toner container, be sure to reset the toner counter. Next time you turn on the power to the printer, keep pushing the key until the Ready indicator lights up. 3-5
-
 1
1 -
2
-
3
-
4
-
5
-
6
-
7
-
8
-
9
-
10
-
11
-
12
-
13
-
14
-
15
-
16
-
17
-
18
-
19
-
20
-
21
-
22
-
23
-
24
-
25
-
26
-
27
-
28
-
29
-
30
-
31
-
32
-
33
-
34
-
35
-
36
-
37
-
38
-
39
-
40
-
41
-
42
-
43
-
44
-
45
-
46
-
47
-
48
-
49
-
50
-
51
-
52
-
53
-
54
-
55
-
56
-
57
-
58
-
59
-
60
-
61
-
62
-
63
-
64
-
65
-
66
-
67
-
68
-
69
-
70
-
71
-
72
-
73
-
74
-
75
-
76
-
77
-
78
-
79
-
80
-
81
-
82
-
83
-
84
-
85
-
86
-
87
-
88
-
89
-
90
-
91
-
92
-
93
-
94
-
95
-
96
-
97
-
98
-
99
-
100
-
101
-
102
-
103
-
104
-
 105
105 -
 106
106 -
 107
107 -
 108
108 -
 109
109 -
 110
110 -
 111
111 -
 112
112 -
 113
113 -
 114
114 -
 115
115 -
116
-
117
-
118
-
119
-
120
-
121
-
122
-
123
-
124
-
125
-
126
-
127
-
128
-
129
-
130
-
131
-
132
-
133
-
134
-
135
-
136
-
137
-
138
-
139
-
140
-
141
-
142
-
143
-
144
-
145
-
146
-
147
-
148
-
149
-
150
-
151
-
152
-
153
-
154
-
155
-
156
-
157
-
158
-
159
-
160
-
161
-
162
-
163
-
164
-
165
-
166
-
167
-
168
-
169
-
170
-
171
-
172
-
173
-
174
-
175
-
176
-
177
-
178
-
179
-
180
-
181
-
182
 |
 |

Toner Container Replacement
3-5
7
While pushing down on the toner container, push lock lever #1 to the
lock (
LOCK
) position. (Lock lever #2 is automatically locked.)
³
If the toner low indication flashes or remains lit after installing the
new toner container, take the toner container out once, shake it well,
then install again.
³
After you have replaced the toner container, be sure to reset the toner
counter. Next time you turn on the power to the printer, keep pushing
the
key until the Ready indicator lights up.
LOCK
UNLOCK
LOCK
UNLOCK
Lock Lever #1
Note