Kyocera 1010N Operation Guide - Page 27
Menu Items, KM-NET Remote Operation
 |
UPC - 632983001004
View all Kyocera 1010N manuals
Add to My Manuals
Save this manual to your list of manuals |
Page 27 highlights
Configuring the Printer 1.3.3 Menu Items When you click the MENU button on the KM-NET Remote Operation Panel utility, the printer menu as shown on the left appears. (This screen is an example only, and the entire menu is not actually displayed.) You can display current settings by clicking each item. The contents displayed will vary depending on the optional devices installed and whether the connection is through a network or local (through a parallel or serial interface). If you have set a password for the Remote Operation Panel utility, a password prompt appears. Enter your password and Note click the OK button. The Menu dialog box appears. For details on passwords, see section 1.6.2 Password for the Printer on page 1-46. 1-16
-
 1
1 -
2
-
3
-
4
-
5
-
6
-
7
-
8
-
9
-
10
-
11
-
12
-
13
-
14
-
15
-
16
-
17
-
18
-
19
-
20
-
21
-
 22
22 -
 23
23 -
 24
24 -
 25
25 -
 26
26 -
 27
27 -
 28
28 -
 29
29 -
 30
30 -
 31
31 -
 32
32 -
33
-
34
-
35
-
36
-
37
-
38
-
39
-
40
-
41
-
42
-
43
-
44
-
45
-
46
-
47
-
48
-
49
-
50
-
51
-
52
-
53
-
54
-
55
-
56
-
57
-
58
-
59
-
60
-
61
-
62
-
63
-
64
-
65
-
66
-
67
-
68
-
69
-
70
-
71
-
72
-
73
-
74
-
75
-
76
-
77
-
78
-
79
-
80
-
81
-
82
-
83
-
84
-
85
-
86
-
87
-
88
-
89
-
90
-
91
-
92
-
93
-
94
-
95
-
96
-
97
-
98
-
99
-
100
-
101
-
102
-
103
-
104
-
105
-
106
-
107
-
108
-
109
-
110
-
111
-
112
-
113
-
114
-
115
-
116
-
117
-
118
-
119
-
120
-
121
-
122
-
123
-
124
-
125
-
126
-
127
-
128
-
129
-
130
-
131
-
132
-
133
-
134
-
135
-
136
-
137
-
138
-
139
-
140
-
141
-
142
-
143
-
144
-
145
-
146
-
147
-
148
-
149
-
150
-
151
-
152
-
153
-
154
-
155
-
156
-
157
-
158
-
159
-
160
-
161
-
162
-
163
-
164
-
165
-
166
-
167
-
168
-
169
-
170
-
171
-
172
-
173
-
174
-
175
-
176
-
177
-
178
-
179
-
180
-
181
-
182
 |
 |

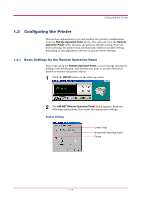
Configuring the Printer
1-16
1.3.3
Menu Items
When you click the
MENU
button on the
KM-NET Remote Operation
Panel
utility, the printer menu as shown on the left appears. (This
screen is an example only, and the entire menu is not actually
displayed.) You can display current settings by clicking each item. The
contents displayed will vary depending on the optional devices installed
and whether the connection is through a network or local (through a
parallel or serial interface).
If you have set a password for the Remote Operation Panel
utility, a password prompt appears. Enter your password and
click the OK button. The Menu dialog box appears.
For details on passwords, see section
1.6.2 Password for the
Printer
on page
1-46
.
Note