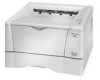
Kyocera 1010N Operation Guide - Page 92
Insert Before Print onto Front, Print onto Back, Source for Print
 |
UPC - 632983001004
View all Kyocera 1010N manuals
Add to My Manuals
Save this manual to your list of manuals |
Page 92 highlights
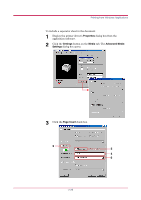
Printing from Windows Applications 4 Enter the page numbers before which you want to insert a page in the Insert Before Page box. The page number range you can specify is from 2 to 255. If you want to specify more than one page numbers, separate them with commas. To specify a range of pages, use a hyphen between the starting and ending numbers in the range. For example, to insert separators before pages 5, 11, 12, 13, and 18, type "5, 11-13, 18." 5 Select the Print onto Front check box to print on the separators. Note that the Print onto Back is not applicable for model FS-1010. If you check this check box on, each separator sheet is printed with data reflecting its position in the entire print job. For example, the separator between pages 9 and 10 will be printed as page 10 when you select this check box. 6 Select the paper source for the separators from the Source for Page drop down list. Note that thick paper, colored paper, etc., should be loaded on the MP tray. 7 Click the OK button to return to the Print dialog box. 8 Load the paper you want to use for the separator(s) onto the paper source specified in step 6. 9 Click the OK button to start printing. Transparency Interleaving This function is available when the current media type is Transparency and the source is MP Tray (see section 1.4.3 Paper Source on page 1-19). It inserts a blank (or printed) backing sheet between the transparencies to be printed. You can print the same content of the transparency on the backing sheet. Transparency Interleaving cannot be used with either Cover Mode or Page Insert. Note 2-27
-
 1
1 -
2
-
3
-
4
-
5
-
6
-
7
-
8
-
9
-
10
-
11
-
12
-
13
-
14
-
15
-
16
-
17
-
18
-
19
-
20
-
21
-
22
-
23
-
24
-
25
-
26
-
27
-
28
-
29
-
30
-
31
-
32
-
33
-
34
-
35
-
36
-
37
-
38
-
39
-
40
-
41
-
42
-
43
-
44
-
45
-
46
-
47
-
48
-
49
-
50
-
51
-
52
-
53
-
54
-
55
-
56
-
57
-
58
-
59
-
60
-
61
-
62
-
63
-
64
-
65
-
66
-
67
-
68
-
69
-
70
-
71
-
72
-
73
-
74
-
75
-
76
-
77
-
78
-
79
-
80
-
81
-
82
-
83
-
84
-
85
-
86
-
 87
87 -
 88
88 -
 89
89 -
 90
90 -
 91
91 -
 92
92 -
 93
93 -
 94
94 -
 95
95 -
 96
96 -
 97
97 -
98
-
99
-
100
-
101
-
102
-
103
-
104
-
105
-
106
-
107
-
108
-
109
-
110
-
111
-
112
-
113
-
114
-
115
-
116
-
117
-
118
-
119
-
120
-
121
-
122
-
123
-
124
-
125
-
126
-
127
-
128
-
129
-
130
-
131
-
132
-
133
-
134
-
135
-
136
-
137
-
138
-
139
-
140
-
141
-
142
-
143
-
144
-
145
-
146
-
147
-
148
-
149
-
150
-
151
-
152
-
153
-
154
-
155
-
156
-
157
-
158
-
159
-
160
-
161
-
162
-
163
-
164
-
165
-
166
-
167
-
168
-
169
-
170
-
171
-
172
-
173
-
174
-
175
-
176
-
177
-
178
-
179
-
180
-
181
-
182
 |
 |
