Kyocera 1010N Operation Guide - Page 34
Cassette 1, After you have selected a paper type, click
 |
UPC - 632983001004
View all Kyocera 1010N manuals
Add to My Manuals
Save this manual to your list of manuals |
Page 34 highlights
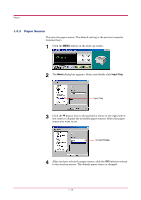
Paper 4 Click the w button next to the pull-down menu on the right side of the screen. Select a paper type. Media type Refer to the following table for paper type that can be set. Paper Type Paper Source MP Tray Plain ! Transparency ! Preprinted ! Labels ! Bond ! Recycled ! Vellum ! Rough ! Letterhead ! Color ! Prepunched ! Envelope ! Cardstock ! Custom 1 (to 8)* ! ! : Can be stored Paper Cassette Cannot be stored * This is a paper type defined and registered by the user. Up to eight types of user settings may be defined. For details, see section 1.4.7 Setting the Weight of the Custom Paper Type on page 1-25. 5 To make the paper type settings for the Cassette 1, select and double click Cassette 1 and repeat the above procedure. 6 After you have selected a paper type, click the OK button to return to the start-up screen. The paper type for each paper source settings are changed. 1-23
-
 1
1 -
2
-
3
-
4
-
5
-
6
-
7
-
8
-
9
-
10
-
11
-
12
-
13
-
14
-
15
-
16
-
17
-
18
-
19
-
20
-
21
-
22
-
23
-
24
-
25
-
26
-
27
-
28
-
 29
29 -
 30
30 -
 31
31 -
 32
32 -
 33
33 -
 34
34 -
 35
35 -
 36
36 -
 37
37 -
 38
38 -
 39
39 -
40
-
41
-
42
-
43
-
44
-
45
-
46
-
47
-
48
-
49
-
50
-
51
-
52
-
53
-
54
-
55
-
56
-
57
-
58
-
59
-
60
-
61
-
62
-
63
-
64
-
65
-
66
-
67
-
68
-
69
-
70
-
71
-
72
-
73
-
74
-
75
-
76
-
77
-
78
-
79
-
80
-
81
-
82
-
83
-
84
-
85
-
86
-
87
-
88
-
89
-
90
-
91
-
92
-
93
-
94
-
95
-
96
-
97
-
98
-
99
-
100
-
101
-
102
-
103
-
104
-
105
-
106
-
107
-
108
-
109
-
110
-
111
-
112
-
113
-
114
-
115
-
116
-
117
-
118
-
119
-
120
-
121
-
122
-
123
-
124
-
125
-
126
-
127
-
128
-
129
-
130
-
131
-
132
-
133
-
134
-
135
-
136
-
137
-
138
-
139
-
140
-
141
-
142
-
143
-
144
-
145
-
146
-
147
-
148
-
149
-
150
-
151
-
152
-
153
-
154
-
155
-
156
-
157
-
158
-
159
-
160
-
161
-
162
-
163
-
164
-
165
-
166
-
167
-
168
-
169
-
170
-
171
-
172
-
173
-
174
-
175
-
176
-
177
-
178
-
179
-
180
-
181
-
182
 |
 |
