Kyocera 1010N Operation Guide - Page 116
Print Quality Problems, Printed Results, Corrective Action
 |
UPC - 632983001004
View all Kyocera 1010N manuals
Add to My Manuals
Save this manual to your list of manuals |
Page 116 highlights
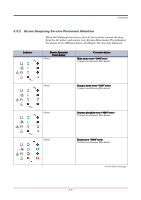
Print Quality Problems 4.2 Print Quality Problems Printed Results All-black printout As the following table shows, there are many possible causes of print quality problems, such as blank output as. The troubleshooting procedure for each type of problem is explained below. If you still can not solve the problem, contact your Kyocera Mita dealer. Corrective Action Contact your Kyocera Mita dealer. Dropouts, horizontal streaks, stray dots Black or white vertical streaks Clean the charger wire. Open the printer's top and front covers. Remove the process unit from the printer and slide the charger knob back and forth to clean the charger wire. (See Chapter 3) Check the operator panel. When the (toner) indicator flashes, install a new toner kit. Clean the printer after replacement. (See Chapter 3) Clean the charger wire. Open the printer's top and front covers. Remove the process unit from the printer and slide the charger knob back and forth to clean the charger wire. (See Chapter 3) Check the position of the charger cleaner knob Open the printer's top and front covers. Remove the process unit from the printer. Make sure the charger cleaner knob is restored to its home position. (See Chapter 3) (Continued on next page) 4-3
-
 1
1 -
2
-
3
-
4
-
5
-
6
-
7
-
8
-
9
-
10
-
11
-
12
-
13
-
14
-
15
-
16
-
17
-
18
-
19
-
20
-
21
-
22
-
23
-
24
-
25
-
26
-
27
-
28
-
29
-
30
-
31
-
32
-
33
-
34
-
35
-
36
-
37
-
38
-
39
-
40
-
41
-
42
-
43
-
44
-
45
-
46
-
47
-
48
-
49
-
50
-
51
-
52
-
53
-
54
-
55
-
56
-
57
-
58
-
59
-
60
-
61
-
62
-
63
-
64
-
65
-
66
-
67
-
68
-
69
-
70
-
71
-
72
-
73
-
74
-
75
-
76
-
77
-
78
-
79
-
80
-
81
-
82
-
83
-
84
-
85
-
86
-
87
-
88
-
89
-
90
-
91
-
92
-
93
-
94
-
95
-
96
-
97
-
98
-
99
-
100
-
101
-
102
-
103
-
104
-
105
-
106
-
107
-
108
-
109
-
110
-
 111
111 -
 112
112 -
 113
113 -
 114
114 -
 115
115 -
 116
116 -
 117
117 -
 118
118 -
 119
119 -
 120
120 -
 121
121 -
122
-
123
-
124
-
125
-
126
-
127
-
128
-
129
-
130
-
131
-
132
-
133
-
134
-
135
-
136
-
137
-
138
-
139
-
140
-
141
-
142
-
143
-
144
-
145
-
146
-
147
-
148
-
149
-
150
-
151
-
152
-
153
-
154
-
155
-
156
-
157
-
158
-
159
-
160
-
161
-
162
-
163
-
164
-
165
-
166
-
167
-
168
-
169
-
170
-
171
-
172
-
173
-
174
-
175
-
176
-
177
-
178
-
179
-
180
-
181
-
182
 |
 |
