Kyocera 1010N Operation Guide - Page 94
Printing Multiple s per Sheet, Source for Backing, Cassette 1, Print onto Backing, Print
 |
UPC - 632983001004
View all Kyocera 1010N manuals
Add to My Manuals
Save this manual to your list of manuals |
Page 94 highlights
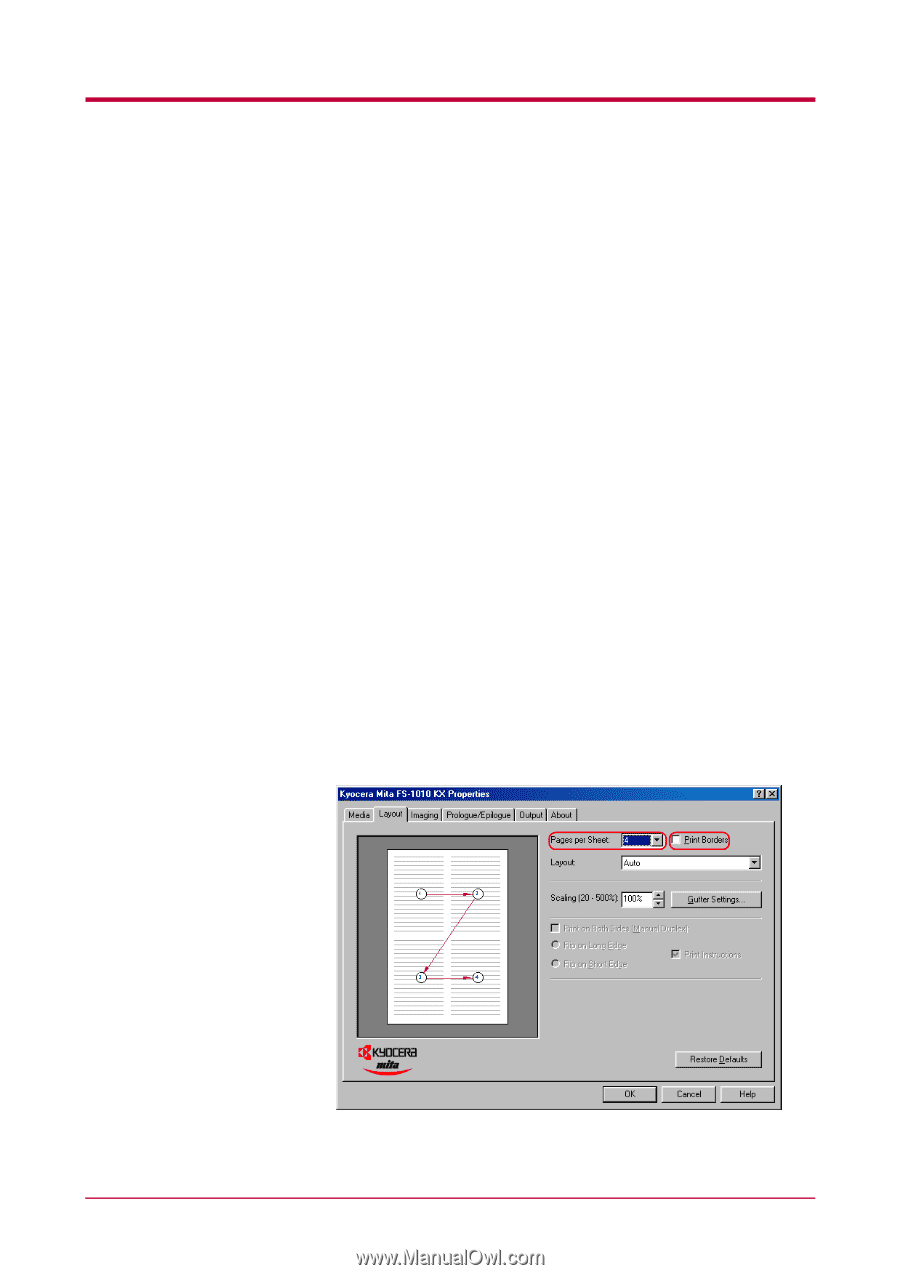
Printing from Windows Applications 5 Select the source for the backing sheet from the Source for Backing list box, for example Cassette 1. 6 Select Print onto Backing if you want the same data to be printed on the backing sheet as on the transparency. 7 Click the OK button to return to the Print dialog box. 8 Load the paper you want to use for the backing(s) onto the paper source specified in step 5. 9 Click the OK button to start printing. 2.3.4 Printing Multiple Pages per Sheet You can print multiple pages on a single sheet of paper, in groups of 1, 2, 4, 6, 9, 12, 16, or 25 pages. You can also select the layout of the pages printed on a sheet. 1 Display the printer driver's Properties dialog box from the application software. 2 Click the Layout tab. 3 Select the number of pages to be printed from the Pages per Sheet drop down list. You may select 1, 2, 4, 6, 9, 12, 16, or 25 pages. The graphic on the left will change to reflect your selection. If you want to add borders to each page printed on the sheet, click Print Borders. 2-29
-
 1
1 -
2
-
3
-
4
-
5
-
6
-
7
-
8
-
9
-
10
-
11
-
12
-
13
-
14
-
15
-
16
-
17
-
18
-
19
-
20
-
21
-
22
-
23
-
24
-
25
-
26
-
27
-
28
-
29
-
30
-
31
-
32
-
33
-
34
-
35
-
36
-
37
-
38
-
39
-
40
-
41
-
42
-
43
-
44
-
45
-
46
-
47
-
48
-
49
-
50
-
51
-
52
-
53
-
54
-
55
-
56
-
57
-
58
-
59
-
60
-
61
-
62
-
63
-
64
-
65
-
66
-
67
-
68
-
69
-
70
-
71
-
72
-
73
-
74
-
75
-
76
-
77
-
78
-
79
-
80
-
81
-
82
-
83
-
84
-
85
-
86
-
87
-
88
-
 89
89 -
 90
90 -
 91
91 -
 92
92 -
 93
93 -
 94
94 -
 95
95 -
 96
96 -
 97
97 -
 98
98 -
 99
99 -
100
-
101
-
102
-
103
-
104
-
105
-
106
-
107
-
108
-
109
-
110
-
111
-
112
-
113
-
114
-
115
-
116
-
117
-
118
-
119
-
120
-
121
-
122
-
123
-
124
-
125
-
126
-
127
-
128
-
129
-
130
-
131
-
132
-
133
-
134
-
135
-
136
-
137
-
138
-
139
-
140
-
141
-
142
-
143
-
144
-
145
-
146
-
147
-
148
-
149
-
150
-
151
-
152
-
153
-
154
-
155
-
156
-
157
-
158
-
159
-
160
-
161
-
162
-
163
-
164
-
165
-
166
-
167
-
168
-
169
-
170
-
171
-
172
-
173
-
174
-
175
-
176
-
177
-
178
-
179
-
180
-
181
-
182
 |
 |